White Balance vs. Color Calibration

White Balance vs. Color Calibration
White balance and color calibration are two key concepts in video production that deal with color accuracy but serve different purposes:
- White Balance adjusts your camera settings to make white objects appear neutral, compensating for the color temperature of the light source (measured in Kelvin). It ensures your footage doesn’t look too warm (yellow/orange) or cool (blue).
- Color Calibration ensures accurate and consistent colors across devices (like cameras, monitors, and projectors) by creating color profiles. It’s used to align colors during post-production or across multiple devices.
Key Differences:
- White Balance: Quick, in-camera adjustment during filming to correct light color casts.
- Color Calibration: A more detailed process done in post-production or device setup to ensure precise color matching across the entire spectrum.
Both are essential for professional-quality visuals, but they tackle separate aspects of color accuracy. White balance is a filming necessity, while calibration ensures consistency in editing and final output.
White Balance vs Color Checker: Ask David Bergman
sbb-itb-4a26d6a
What is White Balance?
To put it simply, white balance is a camera setting that ensures the color white appears as true white in your footage. As StudioBinder explains:
White balance is a camera setting that establishes the true color of white. This produces a baseline from which all other colors are measured.
This reference point is essential for maintaining accurate colors throughout your shot. Once your camera identifies what "white" should look like, it adjusts all other colors in the frame accordingly. This prevents color distortions, like an overly blue (cool) or yellow/orange (warm) cast .
Unlike the human brain, which naturally adapts to different lighting conditions - like moving from sunlight to tungsten-lit interiors - a camera needs explicit guidance to determine what "neutral" white looks like in the current lighting environment.
How White Balance Works
White balance compensates for variations in color temperature, which is measured on the Kelvin (K) scale. Lower Kelvin values create warmer, red-toned light, while higher values result in cooler, blue-toned light.
Here’s how some common lighting scenarios measure on the Kelvin scale:
- Tungsten bulbs: Around 3,200K, producing a warm, orange glow.
- Daylight: Typically between 5,000K and 5,600K, offering a neutral tone.
- Shade or overcast conditions: Ranges from 6,000K to 8,000K, giving a cooler, blueish tint .
To balance these differences, your camera adjusts the red, green, and blue channels. For example, it adds cooler tones to counteract warm lighting or introduces warmth to offset cooler light sources .
Common White Balance Settings
Most cameras come with preset white balance modes tailored to specific lighting conditions. Here are some of the most common ones:
- Tungsten: Corrects the orange cast of indoor incandescent lighting (around 3,200K).
- Daylight: Optimized for outdoor sunlight (around 5,600K) to avoid a blue tint.
- Fluorescent: Adjusts for the greenish hue of office tube lights.
- Cloudy: Warms up cooler tones from overcast skies.
- Flash: Balances the light from external flash units.
For convenience, you can use Auto White Balance (AWB), where the camera estimates the best setting. While AWB works well in controlled environments, it may struggle with mixed or changing light sources.
For the most precise results, use the Custom White Balance option. Place a neutral white or gray card under your primary light source, and let the camera calibrate based on that reference . In professional setups, such as studios with LED or tungsten fixtures, you can manually input the exact Kelvin value for perfect alignment.
Mastering white balance is a critical step before diving into more advanced color calibration techniques. It ensures your footage starts with accurate, natural-looking colors.
What is Color Calibration?
Color calibration goes a step beyond white balance by ensuring complete color accuracy across your devices. As Wikipedia puts it:
The aim of color calibration is to measure and/or adjust the color response of a device (input or output) to a known state.
In simpler terms, it ensures the colors you capture, edit, and eventually deliver stay consistent, no matter the device. Without it, colors can shift wildly - imagine a red shirt looking orange on one screen and burgundy on another. This kind of inconsistency can be a nightmare, especially in professional video production where accurate colors are non-negotiable for things like product visuals, clothing, or maintaining a brand's identity.
To achieve this consistency, color calibration creates device-specific profiles - commonly called ICC profiles - that map each device's unique color response to a standardized color space. The result? What you see on one device matches what others will see.
How Color Calibration Works
The process relies on physical color references, such as color charts or gray cards, to measure and correct a device's color output.
For monitors, a device called a colorimeter is placed directly on the screen. Calibration software then displays a series of color patches - reds, greens, blues, and grayscale tones - while the colorimeter measures the screen’s actual output. The software compares these measurements to target values and generates a correction profile. The goal for professional-grade calibration is a Delta E (ΔE) value below 1, meaning any difference between the displayed and target colors is virtually invisible to the human eye.
For cameras, the process involves capturing an image of a known reference target, like the X-Rite ColorChecker, under the primary lighting conditions. Software such as DaVinci Resolve analyzes these captured colors, compares them to the reference values, and creates a correction matrix to adjust the camera's RGB output. This ensures consistent color reproduction, which is vital in workflows that demand precision.
Where Color Calibration is Used
Color calibration isn’t just about the tools - it’s about maintaining accuracy across the entire production process. In post-production, for example, editors rely on calibrated monitors to ensure accurate color grading and final delivery. Most professionals calibrate their displays to meet the Rec. 709 standard, which includes a 6,500K white point, 2.4 gamma, and 100 cd/m² brightness. This standard aligns with broadcast specifications, making it essential for video work.
In studio setups, calibration is equally important. With multiple cameras in use, calibration ensures all sensors produce matching color values, preventing noticeable shifts when switching between camera angles. This process, often called sensor profiling or color mapping, is critical for maintaining visual consistency. Furthermore, every output device - whether it’s a monitor or a projector - has its own color quirks due to manufacturing differences or aging. To combat this, around 89% of professionals recalibrate their equipment monthly to keep everything accurate.
Key Differences Between White Balance and Color Calibration
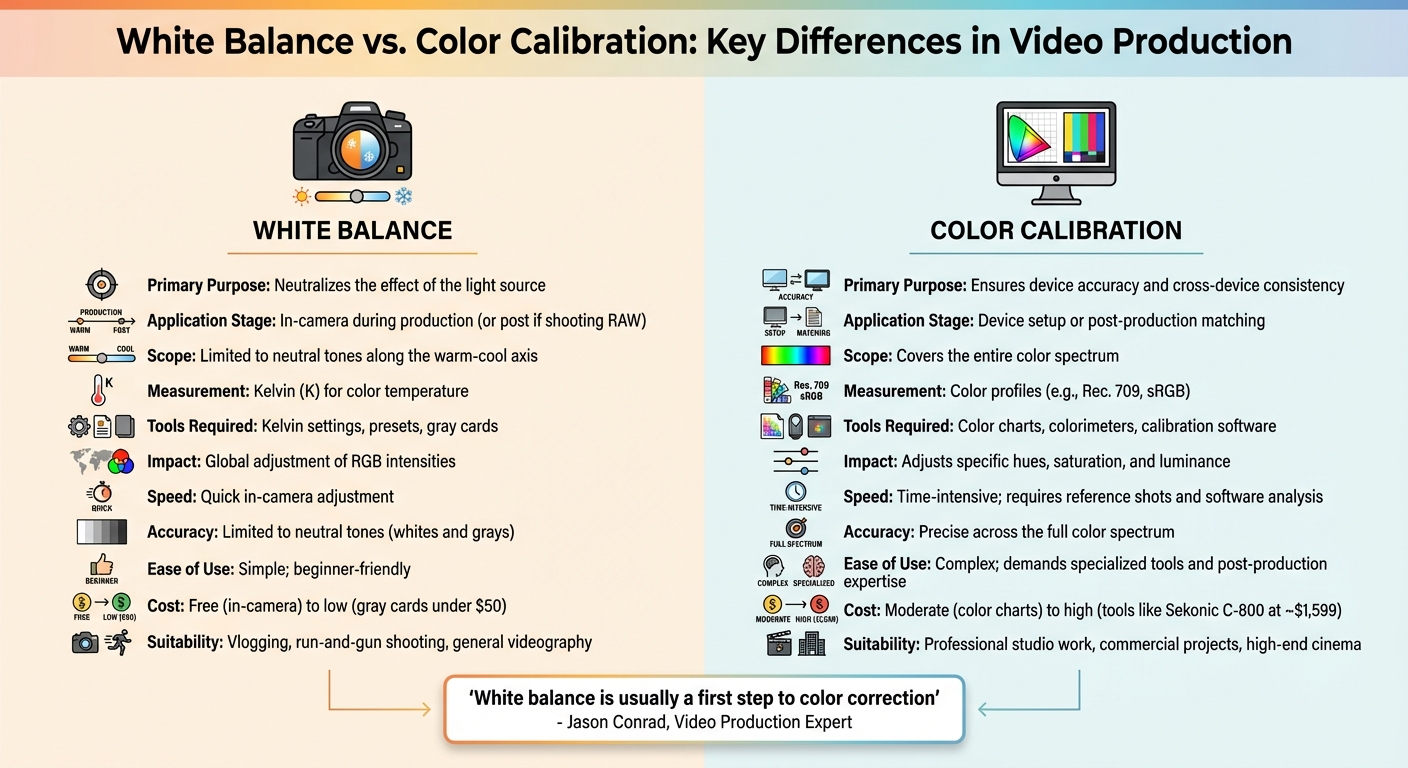
White Balance vs Color Calibration: Key Differences in Video Production
Both white balance and color calibration adjust colors, but they serve distinct purposes in video production. As video production expert Jason Conrad puts it:
White balance is usually a first step to color correction.
White balance deals with the color cast of light, measured in Kelvins, and ensures that the lighting in your footage looks natural. On the other hand, color calibration focuses on creating device profiles that align with a standard color space, ensuring that devices like monitors and cameras display colors accurately.
White balance specifically addresses the light source, neutralizing its color cast by adjusting the image along the warm-cool axis. Calibration, however, goes deeper, correcting the entire color spectrum for consistency across devices.
Timing makes a big difference too. White balance is ideally set during filming, directly in-camera. Video producer Florian Claaßen cautions:
If you set the white balance significantly off and try to pull it back... the colors will start to break apart unless you were recording in a lossless or near-lossless codec.
Color calibration, by contrast, happens during device setup or in post-production. It’s particularly useful when matching footage from multiple cameras or ensuring that your editing monitor reflects accurate colors. Understanding when and why to use each method is key to achieving professional results.
Comparison Table
Here’s a quick breakdown of the differences:
| Aspect | White Balance | Color Calibration |
|---|---|---|
| Primary Purpose | Neutralizes the effect of the light source | Ensures device accuracy and cross-device consistency |
| Application Stage | In-camera during production (or post if shooting RAW) | Device setup or post-production matching |
| Scope | Limited to neutral tones along the warm-cool axis | Covers the entire color spectrum |
| Measurement | Kelvin (K) for color temperature | Color profiles (e.g., Rec. 709, sRGB) |
| Tools Required | Kelvin settings, presets, gray cards | Color charts, colorimeters, calibration software |
| Impact | Global adjustment of RGB intensities | Adjusts specific hues, saturation, and luminance |
In short, white balance deals with lighting conditions, while color calibration ensures consistency across devices. Both are essential, but they tackle different aspects of color accuracy.
When to Use White Balance in Video Production
Getting the white balance right during filming can save you a ton of time in post-production. It ensures your colors stay accurate, which is especially important when dealing with compressed video formats. Making these adjustments on the spot is key to maintaining the integrity of your footage and avoiding unnecessary fixes later.
Here’s how quick adjustments and careful use of presets or manual settings can help you nail in-camera accuracy.
Quick Adjustments for Consistent Results
Mixed lighting conditions can throw off your white balance. For instance, when natural window light (around 5,600K) combines with fluorescent office lighting (roughly 4,500K), your camera might struggle to find a neutral balance. Videographer Margaret Kurniawan explains:
Anytime you mix lighting sources, it's going to make it hard to find your white balance.
Skin tones are often the first to show if something’s off. A cool setting might add a blue tint, while a warm one could make skin look overly orange. This is especially critical for interviews, product demos, or anything where accurate skin tones and true-to-life colors matter. Imagine a product shoot where the colors are off - it’s a recipe for unhappy customers.
Environmental changes also demand attention. Moving between daylight (5,600K) and indoor tungsten lighting (3,200K) can create dramatic color shifts that auto settings may not handle well. Outdoor shoots aren’t exempt either. Whether you’re filming during golden hour, under cloudy skies, or in shaded areas, the color temperature can fluctuate by thousands of Kelvins. Regular adjustments are essential to keep everything looking consistent.
Once you’ve tackled these quick fixes, presets and manual settings can take your control to the next level.
Using Presets or Manual Settings
Most cameras come with presets like Daylight, Tungsten, Cloudy, and Fluorescent, which can help in standard lighting conditions. But when you’re dealing with mixed lighting, presets might not cut it - that’s where manual Kelvin adjustments shine.
Manual settings give you precise control. To set your camera’s Kelvin value accurately, use a gray or white card under the scene’s lighting as a neutral reference. Videographer Hiroshi Hara puts it simply:
A white balance card is just a fancy term for something that's white.
These cards are a budget-friendly alternative to pricey tools like the Sekonic C-800 SpectroMaster, which costs $1,599. Beyond accuracy, manual adjustments let you get creative. For example, you can enhance the warmth of golden hour footage by dialing up to 6,500K–7,500K or cool things down for a moodier vibe. Locking your white balance is also crucial - it prevents mid-shot shifts that can make your footage look unpolished.
When to Use Color Calibration in Video Production
Color calibration is essential when you need precise color accuracy throughout your production workflow. While white balance corrects color casts caused by lighting during filming, calibration ensures consistent color reproduction from capture to final display.
Post-Production and Color Grading
The editing phase is where calibration becomes critical. A properly calibrated monitor ensures that the colors you adjust during editing will match the final output. As mattdm from Photography Stack Exchange explains:
Color calibration usually refers to adjusting a device, such as a monitor or printer, so that digital colors appear in a standard way.
In other words, calibration helps ensure that what you see on your screen is what your audience will see on theirs. Before diving into creative grading, establish a technical baseline by correcting exposure and ensuring uniformity across all footage.
Professional colorists rely on tools like waveform monitors, vectorscopes, and histograms for objective measurements. Human eyes naturally adapt to color shifts, which can lead to inaccuracies. For broadcast standards, aim to keep blacks at 0 IRE and whites at 100 IRE on the waveform monitor. Skin tones, regardless of ethnicity, should align with the "skin tone line" at roughly 120° on a vectorscope.
Your footage must also adhere to specific color space standards based on its intended platform. For HD and web content, Rec. 709 is the standard, while Rec. 2020 is used for 4K and HDR formats. Digital cinema typically requires DCI-P3. To achieve these standards, begin by applying Input LUTs to convert flat Log or RAW footage into the appropriate color space before proceeding with creative adjustments.
Beyond post-production, precise calibration is also crucial in multi-camera setups, particularly in controlled environments.
Studio and Controlled Environments
In multi-camera setups, calibration ensures that all cameras produce consistent color, even if their white balance settings are identical. This process, known as shot matching, compensates for differences in color science between manufacturers or even between individual cameras. Without shot matching, footage from different cameras can appear inconsistent, even under identical lighting.
Using high-quality recording formats enhances the effectiveness of calibration. For example, ProRes 422 HQ provides 10-bit color depth, which allows for more precise adjustments but results in larger file sizes - around 6GB per minute for 4K footage. The additional data ensures that critical color details are preserved. To further simplify post-production, lock your exposure settings during filming to avoid mid-shot shifts that could complicate the calibration process.
Pros and Cons of White Balance and Color Calibration
White balance and color calibration each serve distinct purposes in video and photography, offering unique advantages and limitations. Choosing between them depends on your specific production needs and priorities.
White balance is a fast, in-camera solution that adjusts color tones using presets or auto mode. It’s perfect for fast-paced scenarios like vlogging or on-the-go shooting. However, its simplicity comes with limitations - it only corrects neutral tones (like whites and grays) and doesn’t ensure color accuracy across the entire spectrum. Plus, if you’re working with compressed formats, incorrect white balance settings can compromise color quality during post-production, as there’s less data to recover accurate hues.
Color calibration, on the other hand, provides unmatched precision across the full color spectrum. This is especially important for projects where exact color reproduction - like maintaining brand colors - is critical. However, achieving this level of accuracy requires specialized tools, such as the Sekonic C-800 SpectroMaster (priced around $1,599), and involves a more detailed, time-consuming workflow.
Here’s a side-by-side look at how these two approaches compare:
Comparison Table
| Aspect | White Balance | Color Calibration |
|---|---|---|
| Speed | Quick in-camera adjustment | Time-intensive; requires reference shots and software analysis |
| Accuracy | Limited to neutral tones (whites and grays) | Precise across the full color spectrum |
| Ease of Use | Simple; beginner-friendly | Complex; demands specialized tools and post-production expertise |
| Cost | Free (in-camera) to low (gray cards under $50) | Moderate (color charts) to high (tools like the Sekonic C-800 SpectroMaster at ~$1,599) |
| Suitability | Great for vlogging, run-and-gun shooting, and general videography | Ideal for professional studio work, commercial projects, and high-end cinema |
In short, white balance is a practical choice for everyday filming, while color calibration is indispensable for projects that demand precise color accuracy. Each has its place, depending on your workflow and goals.
Conclusion: Choosing the Right Tool for Your Videos
White balance and color calibration play different but equally important roles in video production. White balance is your go-to solution during filming, ensuring whites appear neutral and removing any unwanted color casts. On the other hand, color calibration becomes essential in post-production, where it helps align shots, fix exposure issues, and establish a consistent base for creative grading.
For fast-paced projects like vlogs or run-and-gun filming, setting an accurate white balance in-camera can save a ton of time in post-production. As cinematographer Mike Leonard explains:
There's color correction, which is the science side of it, and then there's color grading, which is the art of it.
By nailing white balance on set, you minimize the need for tedious corrections later, freeing up time for the creative aspects of grading. However, when accuracy and consistency are critical - especially in studio environments - calibration tools become indispensable.
In controlled settings or projects requiring precise color reproduction, color calibration is key. Using tools like waveform monitors and vectorscopes ensures objective accuracy, rather than relying solely on what looks right to the eye.
To bridge the gap between these approaches, Evelize offers a comprehensive solution with features like 4K resolution, 60 FPS, HDR support, and built-in editing tools. This app helps maintain color consistency throughout your workflow, from shooting to final export. Whether you're working with carefully balanced lighting or need to fine-tune in post, having reliable tools ensures your videos achieve a polished, professional look.
FAQs
Can I fix wrong white balance in post without ruining colors?
Adjusting white balance in post-production is entirely possible without messing up your colors. Editing tools allow you to tweak the color temperature and balance tones effectively. This process works particularly well if you shot the image in RAW format. Why? Because RAW files don’t lock in the white balance, giving you the freedom to make accurate adjustments while preserving the image's quality. Shooting in RAW ensures you can fine-tune details without compromising the overall integrity of your photo.
Do I still need calibration if I shoot RAW or Log?
Yes, calibration plays a key role even when shooting in RAW or Log formats. These formats capture unprocessed sensor data, but setting an accurate white balance is essential for consistent and true-to-life colors. While RAW and Log provide flexibility for color correction during post-production, starting with a neutral white balance makes the grading process much easier. Calibration ensures that devices like monitors and cameras display or capture colors reliably, working hand-in-hand with white balance to achieve professional-grade results.
How often should I calibrate my monitor for video work?
For accurate color reproduction in video work, it's crucial to calibrate your monitor regularly - ideally, once a month. Consistent calibration ensures your colors remain true and dependable, which is critical for achieving professional-quality results. Skipping this step could lead to inconsistent visuals, making your work appear less polished.
Related Posts
Ready to Elevate Your Content?
Try Evelize for free and experience the easiest way to create, edit, and share professional videos. Script writing, teleprompter, and powerful video tools - all in one app!
