Post-Production Workflow Checklist for Creators

Post-Production Workflow Checklist for Creators
Post-production doesn't have to be overwhelming. A clear workflow can save you time, reduce errors, and improve your final product. Here's what you need to know:
- Organize Footage: Back up files immediately using the 3-2-1 backup rule and create a consistent folder structure for easy access.
- Edit Efficiently: Start with a rough cut, refine pacing, and use proxy files for smoother editing. Avoid labeling files "Final" too soon.
- Polish Audio & Visuals: Balance audio levels, apply color correction, and use clean graphics. Keep transitions simple and text readable.
- Quality Control: Check technical specs, review content accuracy, and test across devices to catch errors early.
- Export & Archive: Use H.264 for social media, match platform-specific settings, and follow the 3-2-1 strategy for file storage.
Tools like Evelize simplify the process with features like AI tagging, built-in editing tools, and social media presets. By sticking to a structured approach, you can save time and focus on producing high-quality content.
5-Step Post-Production Workflow for Video Creators
The Pro Post-Production Workflow (Explained Fast)
sbb-itb-4a26d6a
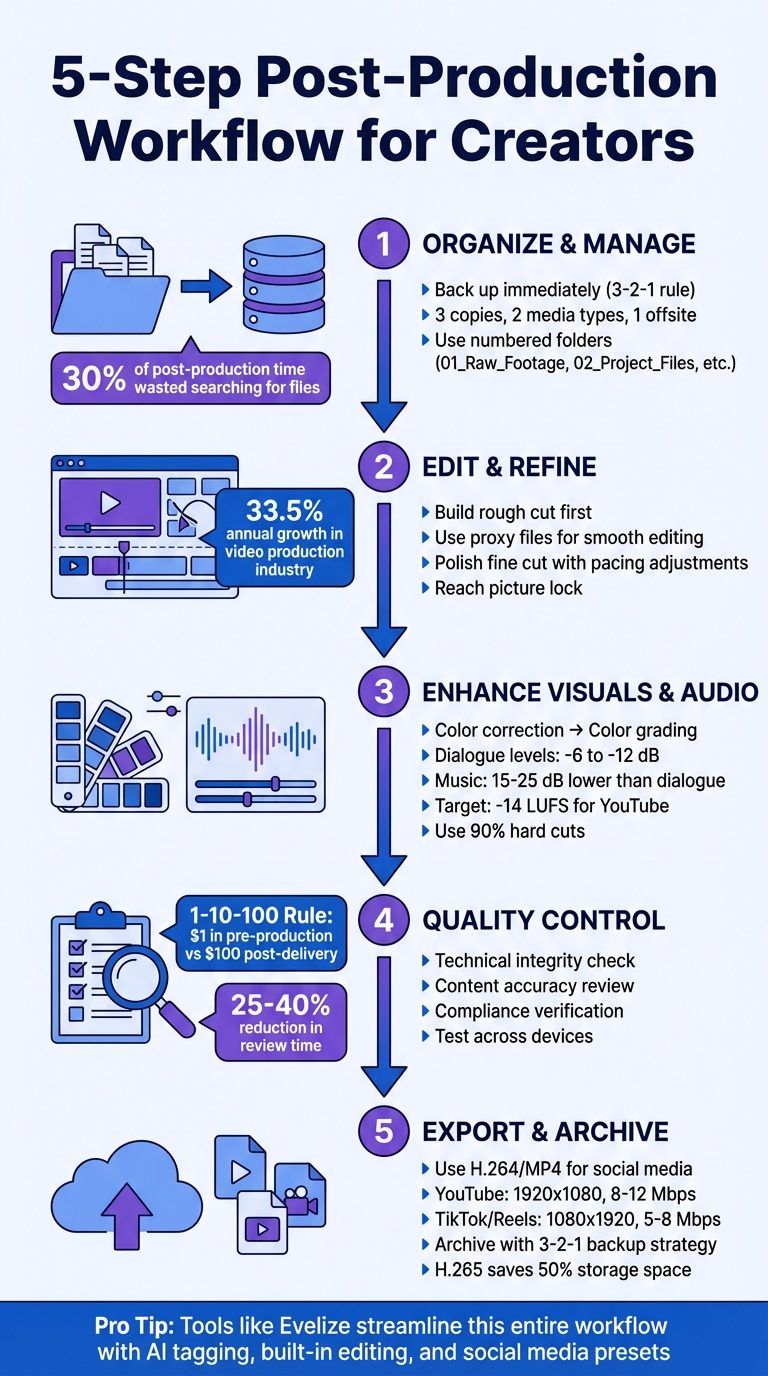
1. Organize and Manage Raw Footage
Post-production kicks off as soon as filming wraps up. Raw footage left on memory cards is at risk - hardware can fail, files can corrupt, or cards might get erased accidentally. Did you know that 30% of post-production time is often wasted just searching for files? Getting organized right from the start avoids these headaches and sets the stage for a smoother editing process.
Transfer and Back Up Files
Protecting your footage early is crucial to avoid setbacks later. As soon as you remove the memory card, back up the footage immediately. Use transfer software with checksum verification to ensure the backup matches the original files. This step can help detect any file corruption before it becomes a bigger issue.
"The very first thing you should do as soon as a card has been removed from the camera is back it up. In multiple places." - Frame.io
Stick to the 3-2-1 backup rule: keep three copies of your footage, store them on two different types of media, and ensure one copy is offsite or in the cloud. For active editing, a high-speed SSD will provide smooth playback. Add a local backup drive for redundancy and set up automatic cloud syncing for extra protection. This layered approach ensures you’re covered in case of hardware failures. And don’t forget to archive your original camera negatives for safekeeping.
Organize Files for Quick Access
A well-thought-out folder structure can save you hours of frustration. Start with numbered top-level folders like 01_Raw_Footage, 02_Project_Files, 03_Audio, 04_Graphics, and 05_Renders. Within the Raw_Footage folder, create subfolders for each shoot day or location to make navigation effortless.
Adopt a consistent naming convention, such as ProjectName_2026-03-30_Scene_ShotType_Take01, to make files easy to locate. During import, tag clips with keywords like “interview,” “B-roll,” or “transition” to speed up searches later. If you’re looking to save even more time, modern AI tools can automatically generate these tags for you, reducing manual work.
"Organizing video files isn't cosmetic housekeeping. It's the infrastructure that determines whether you spend your day creating or searching." - Danny G., Crayo AI
2. Edit and Refine Video Content
Editing turns raw footage into a cohesive story. As the video production industry grows at an annual rate of 33.5%, mastering efficient editing techniques is essential for creators to keep up with demand. Once your footage is organized, the focus shifts to shaping it into a compelling narrative through a step-by-step editing process.
Build the Rough Cut
Begin by selecting the strongest takes from your footage. This "selects" phase is often handled by assistant editors, who review all clips to identify the best ones before the lead editor assembles them. Place these chosen clips on your timeline in the order outlined by your script. At this stage, the goal is to establish the basic flow of the story without adding music, effects, or final edits.
Trim down unnecessary content and ensure the narrative flows logically. Use scratch tracks for temporary voice-overs, placeholder music, and visual effects to establish timing and rhythm. To keep your editing software running smoothly, create low-resolution proxy files that reduce the strain on your hardware during playback. Avoid naming files "Final" prematurely; instead, use a clear naming system like Project_RoughCut_2026-03-30 to track revisions.
"I think most people realized that as long as you can receive the footage in some way, you don't need to be face-to-face to be able to create a finished video." - MediaSilo Customer
This rough cut lays the groundwork for the detailed adjustments made in the fine cut.
Polish the Fine Cut
The fine cut is where every detail is refined. Adjust the pacing to create emotional highs and lows - too many fast cuts can overwhelm viewers, while slow, unchanging edits risk losing their attention. Focus on moments that allow the story to breathe, such as lingering on a character's expression or using silence to evoke emotion. During this stage, synchronize audio, refine transitions, and add text overlays to enhance the context.
"A well-paced film keeps the viewer absorbed, subtly guiding them through the emotional landscape of the story." - David Winter, Author
Four key factors influence pacing: the speed of cuts, the action within each shot, the subject's proximity to the camera (close-ups feel faster than wide shots), and camera movement like pans or zooms. Before finalizing, conduct a thorough quality check by watching the entire video to catch typos, audio issues, or uneven pacing. Once all adjustments are complete, the project reaches picture lock, where all shots are finalized.
Use Evelize for Social Media Optimization

Social media platforms require content tailored to their specific formats, and Evelize simplifies this process with its built-in social media presets. These presets allow you to quickly trim and crop videos to fit formats like Instagram Reels, TikTok, or YouTube Shorts without manual resizing. Evelize also supports 4K, 60 FPS, and HDR, ensuring your content looks polished.
With Evelize, you can repurpose a single long-form video into multiple shorter clips for different platforms. Its customizable teleprompter settings help you deliver scripts smoothly during recording, avoiding any sync issues. For creators juggling multiple projects, Evelize's script organization and search tools make it easy to locate and edit specific content. By using Evelize's tools, you can efficiently prepare native social content, an area where 64% of video editing software usage now relies on cloud-based solutions.
3. Enhance Visuals and Audio
Once the picture lock is in place, it's time to refine visuals and audio to boost production quality. Poor sound, in particular, can drive viewers away faster than you might think.
Color Correction and Grading
Start with color correction to ensure the basics - like exposure and white balance - are properly balanced. After that, move on to color grading, where you can get creative and set the tone of your project. The process usually begins with primary grading, which involves adjusting global elements such as contrast, color temperature, and saturation. Then, secondary grading allows for more precise tweaks, like perfecting skin tones or emphasizing specific objects.
Tools like waveform monitors and vectorscopes can help ensure technical accuracy. If you're using creative LUTs (Look-Up Tables), apply them at 50–70% intensity and make further adjustments to keep the result looking natural. Want that cinematic vibe? Add a touch of film grain (20–40% intensity) or try subtle halation, which creates a soft glow around highlights. Adjust color temperature to match the feel you’re going for - tungsten lighting at 3,200K gives a warm, inviting look, while overcast daylight at 6,500K creates a cooler, more somber atmosphere.
"Color is the secret language of visual storytelling." - Vibbit
Once your visuals are polished, it’s time to focus on audio clarity and engagement.
Sound Design and Mixing
Audio plays a crucial role in transforming raw footage into a polished experience. Marco Sebastiano Alessi from Boris FX puts it perfectly:
"High-quality and great sound design can compensate for bad video footage, but a high-quality image can hardly fix a poor sound"
Start by balancing dialogue levels, aiming for peaks between -6 dB and -12 dB for clarity. Use a high-pass filter below 80 Hz to cut out low-frequency noise, and boost the 3–5 kHz range to make speech more intelligible. Background music should sit 15–25 dB lower than dialogue to avoid interference. To keep the audio dynamic, use ducking (sidechain compression) to automatically lower music volume during dialogue and raise it during pauses.
Smooth out transitions between audio clips with short crossfades of 5–20 milliseconds to avoid clicks or pops. For platforms like YouTube, target a loudness level of -14 LUFS (Loudness Units relative to Full Scale). Panning can also help distribute sounds across the stereo field, preventing everything from feeling crammed in the center.
With your audio and visuals in sync, it's time to incorporate clean graphics and subtle effects.
Add Visual Effects and Graphics
Graphics and visual effects should complement your story, not overwhelm it. Use lower thirds to identify speakers, title cards to mark new sections, and call-to-action cards to guide viewers. Keep on-screen text concise - stick to keywords or short phrases.
For readability, choose clean, sans-serif fonts like Helvetica or Arial and ensure they contrast well with the background. Adding a subtle drop shadow can make text easier to read. Always keep text and graphics within the title-safe area to ensure they display correctly on all devices and aspect ratios. When it comes to transitions, use them thoughtfully: cuts act like periods, dissolves suggest a passage of time, and fades to black signal the end of a segment. Stick to clean, hard cuts for the majority of your edits - about 90% - to maintain a polished, professional look.
Skip flashy effects that can quickly feel outdated. Instead, use subtle zooms and motion graphics to emphasize important points or explain complex ideas without pulling attention away from your story.
Final Review and Quality Control
Once you've polished your visuals and audio, it's time to focus on a thorough quality control process. This step is crucial to avoid costly mistakes. The 1‑10‑100 rule highlights the importance of catching errors early: a mistake caught in pre-production might cost $1, while the same issue in post-production could cost $10, and if discovered after delivery, it could soar past $100. A structured review ensures your video not only meets technical standards but also delivers the professional quality your audience expects.
Review Checklist for Edits
A successful review process involves three distinct passes:
-
Technical Integrity
Start by verifying that the file container, codec, resolution, and frame rate align with delivery requirements. Use tools like a waveform monitor and vectorscope to confirm luminance and color safety - ensuring blacks aren't overly dark and whites aren't overexposed. Check audio levels to meet integrated loudness standards (–24 LKFS in the US or –23 LUFS in the EU), with True Peak levels staying at or below –2 dBTP. -
Content Accuracy
Carefully review on-screen text for spelling and grammar issues. A helpful trick? Read the text backwards, sentence by sentence, to spot errors you might otherwise overlook. Double-check all URLs and call-to-action buttons for functionality. Ensure consistent use of brand colors and logos throughout the video. -
Compliance and Legal
Confirm that all music licenses and talent releases are in place. Additionally, ensure your video adheres to WCAG accessibility standards by avoiding flashes exceeding three times per second.
"A single‐pass QC is just a preview. A true QC workflow requires dedicated, focused passes for technical, content, and compliance checks. Anything less is just hoping for the best." – Maria Flores, VP of Global Post‐Production
For critical projects, apply the "Four-Eyes" Principle: have a second reviewer perform a spot check after the primary review. This extra layer of scrutiny can help catch any overlooked issues.
Test Across Devices
The last step in quality control is testing your video on various devices, including laptops, high-quality monitors, and mobile phones. This helps identify compression artifacts, color inconsistencies, cropping issues, and audio sync problems . Make sure all text and graphics stay within the Title Safe Area to prevent cropping on different screens. Use a phase correlation meter to detect any out-of-phase audio that might disappear on mono playback systems. Finally, confirm that your export matches platform specifications for aspect ratios and metadata.
5. Export and Deliver Content
Once you've ensured your video meets quality standards, it's time to focus on exporting and delivering it in a way that guarantees smooth playback and compatibility across platforms.
The export and delivery stage is all about technical precision. The MP4 format using the H.264 codec is widely recognized as the best option for social media videos. It strikes a balance between file size and quality. As Gabriel Both, SEO Manager at Hike, puts it:
"H.264 remains the most universally compatible codec for social media videos, with excellent compression and no meaningful quality degradation".
Choose the Right Export Settings
Start by exporting your video at the same resolution it was recorded in - whether that's 1080p or 4K. Be sure to match the export frame rate to your timeline to avoid playback issues like choppiness. For YouTube, you might even consider upscaling 1080p videos to 4K to take advantage of the platform's better playback codecs.
Here are some platform-specific recommendations:
- YouTube: Standard 16:9 videos work best at 1920x1080 resolution with an 8–12 Mbps bitrate.
- TikTok and Instagram Reels: Vertical videos (9:16) should be exported at 1080x1920 with a 5–8 Mbps bitrate. Make sure to leave a 250px margin at the top and bottom to keep on-screen text or calls-to-action clear and unobstructed.
For audio, use AAC-LC at 48kHz with a minimum bitrate of 128 kbps. If you want the best possible sound quality, aim for 320 kbps.
Once your export settings are dialed in, you’re ready to move on to archiving your files.
Archive and Store Files
Proper file archiving ensures you can easily access and edit your work in the future. A good rule of thumb is to follow the 3-2-1 backup strategy:
- Keep three copies of your exported video.
- Store these copies on two different types of media (e.g., a local RAID system and a portable SSD).
- Keep one copy in a separate physical location, such as offsite or in cloud storage.
For long-term storage, save a high-quality Master file in formats like Apple ProRes 422 HQ or Avid DNxHR. If you're looking to save space, H.265 (HEVC) is a great alternative, offering up to 50% better compression than H.264. For example, a 60-minute video that would take up 70GB uncompressed can be stored much more efficiently using H.265.
Conclusion
A well-structured workflow transforms the chaos of post-production into a smooth, predictable process. By carefully organizing raw footage, refining edits, enhancing visuals and audio, performing detailed quality checks, and exporting with the right settings, you can sidestep production bottlenecks and save valuable time.
To recap: efficient organization, precise editing, and thorough quality checks are the cornerstones of a strong workflow. This approach can cut review time by 25–40%, giving you more room to focus on creative storytelling instead of fixing avoidable errors. As Kreatli aptly states:
"Scaling post production is not just hiring more editors, it is removing the everyday frictions that multiply as teams, clients, and projects grow."
Tools like Evelize make this process even easier by combining professional recording features, built-in editing tools, and export presets for social media. From recording in 4K at 60 FPS with HDR to editing and exporting optimized content, everything happens within a single platform.
Consistency is the secret ingredient. Stick to standardized file naming, apply the 3-2-1 backup rule, and automate repetitive tasks wherever possible. A streamlined workflow not only speeds up production but also improves the quality of your content while reducing stress.
FAQs
What’s the fastest way to set up a folder and naming system for a new project?
Creating a clear and consistent file naming system is a game-changer for managing your media files. Include essential details like the date, project name, scene, or shot. For example: "20240329-ProjectName-Scene01-Take01.mov". This approach makes files easy to identify at a glance.
Pair this with a well-organized folder structure. Arrange folders by project phases or categories, such as raw footage, edits, and exports. A consistent setup not only cuts down on confusion but also keeps your workflow running smoothly and efficiently.
When should I use proxy files, and how can I avoid timeline playback lag?
When working with high-resolution or data-heavy footage, using proxy files can save you from frustrating lag or choppy playback. Proxy files are essentially lower-resolution versions of your original media, designed to make playback and editing much smoother.
Here’s how it works: Create and attach proxies to your original files, edit your project using these proxies, and then switch back to the full-resolution files when it’s time to export. This way, you can enjoy a seamless editing experience without sacrificing the quality of your final video.
What export settings should I use for YouTube vs. TikTok/Reels?
When creating videos for YouTube, aim for a resolution of 4K (3840×2160) or 1080p (1920×1080) with a 16:9 aspect ratio for widescreen playback. For TikTok or Reels, export your vertical videos at 1080×1920 resolution with a 9:16 aspect ratio.
In both cases, use the MP4 format with the H.264 codec. Set the bitrate between 10-12 Mbps and ensure the audio uses AAC at 128-192 kbps for the best quality and compatibility.
Related Posts
Ready to Elevate Your Content?
Try Evelize for free and experience the easiest way to create, edit, and share professional videos. Script writing, teleprompter, and powerful video tools - all in one app!
