Teleprompter Audio Sync: Common Mistakes
Teleprompter Audio Sync: Common Mistakes
When your audio and video don’t align in teleprompter recordings, it’s distracting and harms your credibility. Even a millisecond misstep - like mismatched lip movements - can drive viewers away. The most common causes? Recording errors (like variable frame rates or poor audio input), skipping test runs, and editing mistakes (like mismatched timeline settings or over-reliance on auto-sync tools).
Key Tips for Perfect Sync:
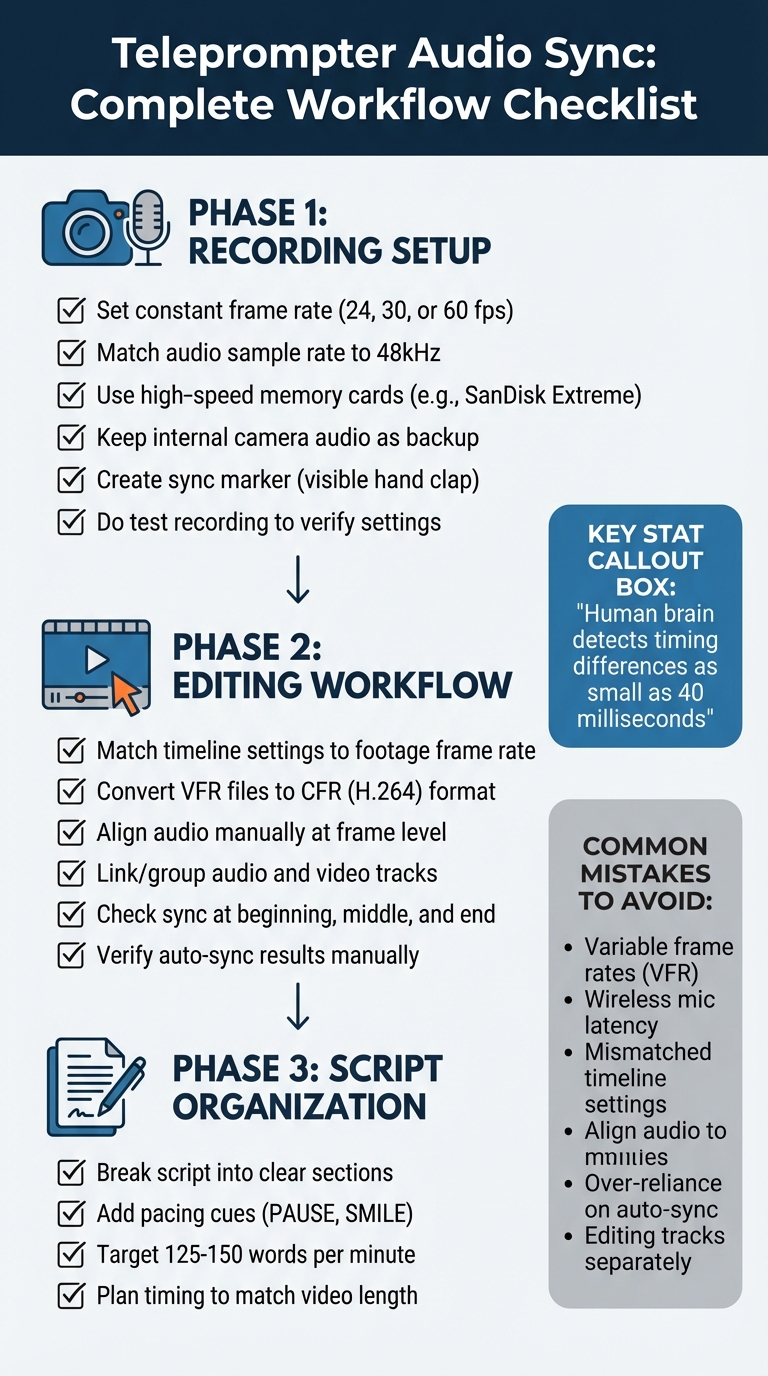
- During Recording: Use constant frame rates (e.g., 24, 30, or 60 fps), match audio sample rates (48kHz), and do test runs with a visible sync marker (like a hand clap).
- During Editing: Align audio manually if auto-sync tools fail, ensure timeline settings match your footage, and check sync throughout the video.
- Equipment Setup: Use high-speed memory cards, avoid wireless mic latency, and keep internal camera audio as a backup.
Audio-Video Sync Checklist: Recording to Editing Workflow
Recording Mistakes That Cause Sync Problems
Many sync issues can be traced back to the recording phase, and most of them are entirely avoidable with proper preparation. Let’s take a closer look at the common technical missteps that can throw your audio and video out of sync.
Inconsistent Frame Rates
Variable frame rates (VFR) are a major culprit. Devices like smartphones and tablets often default to VFR to conserve storage, but this can wreak havoc on audio sync. Video editor Steven Litton explains:
"Variable frame rates are good for optimising video based on the device's speed and storage capabilities. Unfortunately, using variable frame rates will always cause issues for sound because they don't conform to a standard frame rate when being imported into a video editing tool."
To avoid this, set your recording device to a constant frame rate - standard options include 24, 30, or 60 frames per second. If you’re working with multiple cameras, ensure they’re all set to the same frame rate. Mismatched rates can lead to progressive drift, where the audio gradually falls out of sync with the video.
Another issue to watch for is slow memory cards. If your memory card can’t handle the data being written quickly enough, your camera might drop frames during recording, causing sync headaches. Opt for high-speed cards, like the SanDisk Extreme series, to prevent this.
Poor Audio Input and Device Configuration
Audio and video devices need to be on the same page - literally. Make sure both are set to the same sample rate, typically 48kHz for video, to keep sync drift at bay. Before recording, double-check that your camera and any external audio recorders are configured to this standard.
"Verify that your audio sample rate (48kHz is common for video) remains consistent throughout to avoid drift across lengthy recordings." - Brandon Copple, Head of Content, Descript
If you’re using wireless microphones or USB audio interfaces, be mindful of latency. These devices can introduce delays between sound capture and recording, which complicates syncing during editing. Built-in camera microphones, while not ideal for final audio, often have minimal latency and can serve as a helpful reference when syncing higher-quality external audio tracks.
Skipping Test Recordings and Rehearsals
A quick test recording can save you hours of frustration later. Always start your session with a sync clap - clap your hands visibly on camera to create a clear audio-visual marker. This makes aligning tracks during editing much easier.
During your test, confirm that:
- Frame rate and sample rate settings are consistent across all devices.
- Microphone levels are clear, with no distortion.
- A distinct sync reference (like the hand clap) is present.
Rehearsing with your actual equipment - not just reading through the script - can also help you catch potential issues, such as codec latency. This subtle delay occurs when devices process audio and video at slightly different speeds, leading to desync.
Editing Mistakes That Break Audio Sync
Once you've captured your recordings perfectly, the next critical step is editing. While precise recording builds credibility, careful editing ensures you maintain viewer trust. Even the best footage can be ruined by editing mistakes that throw audio and video out of sync.
Mismatched Timeline and Frame Rate Settings
One of the most common culprits behind sync issues is a mismatch between your editing timeline and the source footage settings. For example, if you place footage recorded at 23.976 fps onto a 24 fps timeline, the audio may start in sync but gradually drift out as the video plays. Over the course of a 10-minute video, this kind of drift can become glaringly obvious. As Brandon Copple, Head of Content at Descript, explains:
"Even if you've done everything right behind the camera, mismatched frame rates can sabotage your audio-video alignment".
This issue is especially common with smartphone or screen recordings, which often use Variable Frame Rate (VFR) files. Professional editing software like Premiere Pro works best with Constant Frame Rate (CFR) files, so importing VFR footage can wreak havoc on your sync. A simple solution is to convert these files to a CFR MP4 (H.264) format using a tool like HandBrake before importing them into your editor.
Relying Too Much on Automatic Sync Tools
Automatic sync features in editing software are a lifesaver - until they're not. These tools rely on matching audio peaks, which makes them vulnerable in noisy environments or when dealing with recordings that have overlapping or similar sounds. Sometimes, the software might mistakenly align the audio to the wrong peak in the waveform, causing subtle sync issues that can go unnoticed at first.
"It's wise to do a quick visual check after relying on automated features - manual verification is essential." – Brandon Copple, Head of Content, Descript
After using auto-sync, zoom in and ensure that the audio peaks match visible cues, like a hand clap or lip movement. Play back random sections of your video to confirm the sync stays consistent throughout. To make this process easier, temporarily increase the audio gain to make waveforms more visible for fine-tuning.
For longer recordings (40+ minutes), even professional equipment can experience slight timecode drift, moving one or two frames out of sync over time. Automated tools often miss these gradual shifts, so manual spot checks become even more important.
Editing Audio and Video Tracks Separately
Separating audio and video tracks during editing might seem harmless, but even tiny misalignments can snowball into noticeable sync problems. A shift of just a few milliseconds can create the distracting effect of a poorly dubbed movie.
To avoid this, always link your audio and video tracks as soon as you start editing. Most editing software includes a "Link" or "Group" function to ensure that any adjustments to the video also apply to the audio. In Adobe Premiere Pro, you can use the "Merge Clips" feature to sync separate files into one asset. However, professional editor Chris Tennant cautions:
"Merged clips are taboo in professional workflows. They are destructive, meaning they strip the audio metadata and make it difficult to link back to original media for turnovers".
For professional projects, multicam clips are a better option.
If you need to edit audio and video separately, zoom in to the frame level and use markers to align reference points in both tracks. If shifting the audio creates gaps, fill them with room tone - ambient background noise recorded on location - to maintain a seamless sound. For long takes where drift occurs, split the audio and video at natural pauses and realign each section individually rather than trying to fix the entire timeline at once.
Up next, we'll explore how to prevent these issues and restore sync in your projects efficiently.
sbb-itb-4a26d6a
How to Prevent and Fix Sync Problems
Avoiding sync issues starts with careful preparation before recording and applying precise editing techniques afterward.
Pre-Recording Setup Steps
Start by ensuring all your devices are set to the same frame rate. For example, if you're filming at 30 fps, set your audio to 48 kHz. This is the standard sample rate for video production and helps prevent audio drift during longer recordings.
Use a clear sync marker at the start of your recording. A simple clap - both visible and audible - creates a sharp spike in the audio waveform and a distinct visual cue. This makes syncing much easier during editing. As Brandon Copple, Head of Content at Descript, explains:
"A clapper usually creates a sharp spike in the audio waveform that's easy to identify".
If you're using an external microphone, keep your camera's internal audio running as a backup. Even if the quality isn't great, its waveform can act as a reference point to align your high-quality audio track in post-production.
For a more streamlined process, consider tools like Evelize. This app combines recording and script management, offering features like customizable teleprompter settings and support for 4K resolution at 60 FPS. It helps you maintain consistent frame rates and reduces the risk of mismatched settings that can lead to sync problems.
Once your recording setup is solid, the next step is to master editing techniques for perfect synchronization.
Quick Sync Fixes During Editing
Zoom in on your editing timeline at the frame level to spot alignment cues. Look for distinct audio waveform peaks, such as a clap or plosive sounds (like “P” or “B”), and match them with the corresponding visual actions. Scrubbing through the timeline frame by frame gives you the precision needed for perfect alignment.
Check the sync at multiple points in your video - beginning, middle, and end - to ensure everything stays aligned throughout.
If automated sync tools don’t work as expected, manually nudge the audio track in small increments. Use the waveform as your guide; sharp spikes in the audio should align precisely with the matching visual moments.
For sync issues that arise only after exporting, try re-encoding your video into a standard MP4 (H.264) format. This often fixes problems caused by file corruption or codec-related delays in the final output.
In addition to technical fixes, organizing your script can help maintain consistent timing and pacing.
Using Script Organization to Maintain Sync
A well-structured script can be a game-changer for keeping your video synchronized and on track. Break your script into clear sections and include pacing cues, such as (PAUSE) or (SMILE), to guide the delivery.
Evelize simplifies this process with tools that let you create, format, and manage multiple scripts. You can instantly access these scripts during recording, and the app’s search feature helps you quickly find specific sections. This makes it easier to match your footage to the script during editing.
Plan your script timing in advance to match your video length. For conversational videos, aim for a speaking speed of 125 to 150 words per minute. For example, a one-minute script should have around 130 to 150 words. This planning minimizes retakes and helps maintain a steady pace throughout your video.
Conclusion: Key Steps for Perfect Audio Sync
Getting audio and video perfectly in sync boils down to a few critical practices: standardizing your technical settings, marking clear sync points, and organizing your workflow from start to finish. These steps build on the techniques discussed earlier, helping you avoid the sync issues that can ruin viewer experience and trust.
Start by ensuring all your devices are set to the same frame rate and use a 48 kHz audio sample rate before you hit record. Always kick off each take with a sharp clap or a clear visual cue - this creates a noticeable spike in your waveforms, making alignment easier. Even the smallest misalignment can disrupt the viewing experience; the human brain can detect timing differences as tiny as 40 milliseconds.
Once your recording setup is solid, turn your attention to editing. Scrutinize your timeline at the frame level and check the sync at multiple points throughout your video. If automated syncing tools don't quite get it right, manually adjust the audio track by matching waveform peaks. When you're done editing, re-encode your video into a standard MP4 (H.264) format using software like HandBrake.
Even your script can play a role in maintaining sync. Break it into clear, manageable sections and aim for a speaking speed of 125 to 150 words per minute. Tools like Evelize, which combine script management with recording features, can help ensure consistent frame rates and reduce sync issues from the outset.
FAQs
How can I ensure my teleprompter videos have perfect audio and video sync?
To ensure your teleprompter recordings have perfectly synced audio and video, start by setting your camera to a consistent frame rate, such as 30 fps or 60 fps. This helps avoid timing mismatches. Pair this with a high-quality external microphone - like a lavalier or shotgun mic - positioned close to the speaker. This setup minimizes latency and reduces background noise for clearer audio.
Before you start recording, create a sync marker. A simple way to do this is by clapping your hands or using a clapperboard. This gives you a clear reference point to align the audio and video during editing.
In the editing phase, use the clap marker to match the audio spike with the exact frame of the visual clap. Pay attention to the teleprompter's scroll speed - make sure it flows naturally with your speech and camera movements for a seamless delivery. Once your edits are complete, test the video on different devices to ensure the audio-video sync remains intact across platforms.
By following these tips, you’ll be able to create polished, professional videos with perfectly aligned sound and visuals.
What are the main reasons audio and video go out of sync in teleprompter videos?
Audio and video sync problems can happen for several reasons, including mismatched frame rates, improper file conversions that disrupt timing, or editing errors like misaligned cuts. On the technical side, issues such as outdated firmware, loose connections, or incorrect audio settings can also throw things out of sync.
To reduce the chances of these headaches, make sure your frame rates match, rely on quality equipment, and carefully review your export settings. Tools like Evelize, created with content creators in mind, can simplify your workflow and help keep sync issues at bay.
How can I fix audio and video sync issues during editing?
To tackle audio-video sync issues in your teleprompter videos, the first step is to determine whether the issue lies in the original file. Play the video in a few different media players - if the sync is off in all of them, it’s best to re-record or secure a clean version before diving into edits.
Next, confirm that the video’s frame rate (like 30 fps or 60 fps) matches your project settings. Mismatched frame rates can cause audio and video to drift out of sync. To make alignment easier, include a clear visual or audio cue at the start of your recording, such as clapping your hands or saying "sync." When editing, zoom in on the audio waveform in your software and adjust the audio track to match the visual cue precisely.
For fine-tuning, most editing tools have an audio offset feature. Use it to nudge the audio track slightly forward or backward (e.g., by -0.15 seconds) until the sound and visuals align perfectly. Once your edits are complete, export the video with consistent settings and test it on a variety of devices to ensure the sync remains intact across platforms. Following these steps will help you produce seamless, professional-quality videos.
Related Posts
Ready to Elevate Your Content?
Try Evelize for free and experience the easiest way to create, edit, and share professional videos. Script writing, teleprompter, and powerful video tools - all in one app!
