
3-Point Lighting Setup Basics
3-Point Lighting Setup Basics
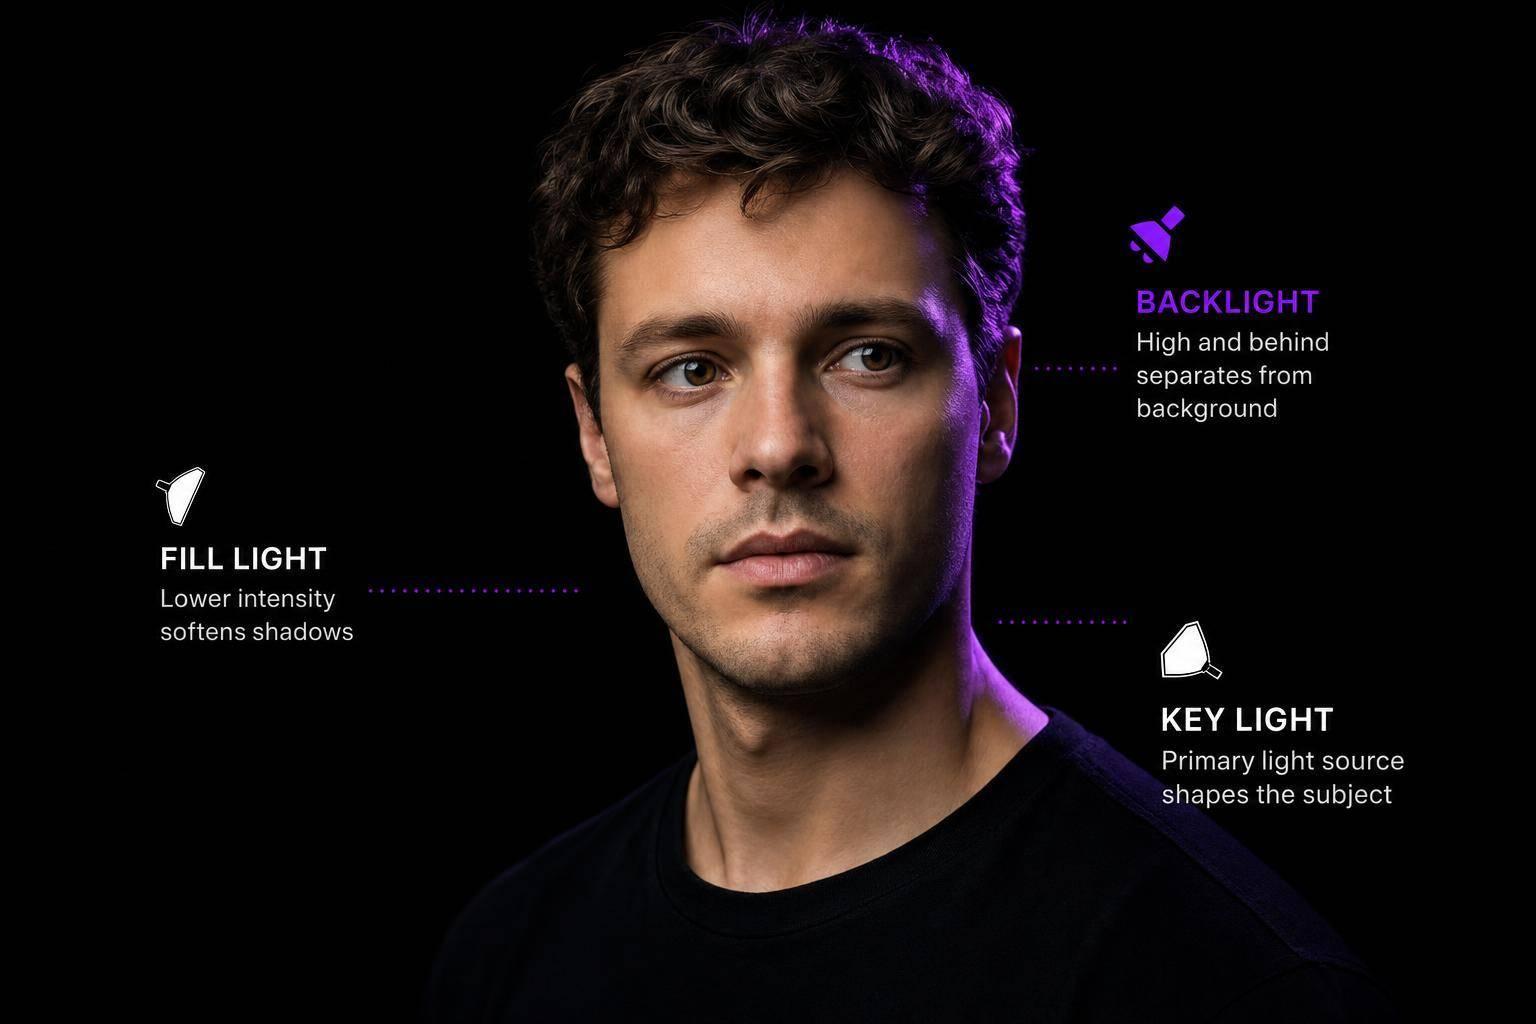
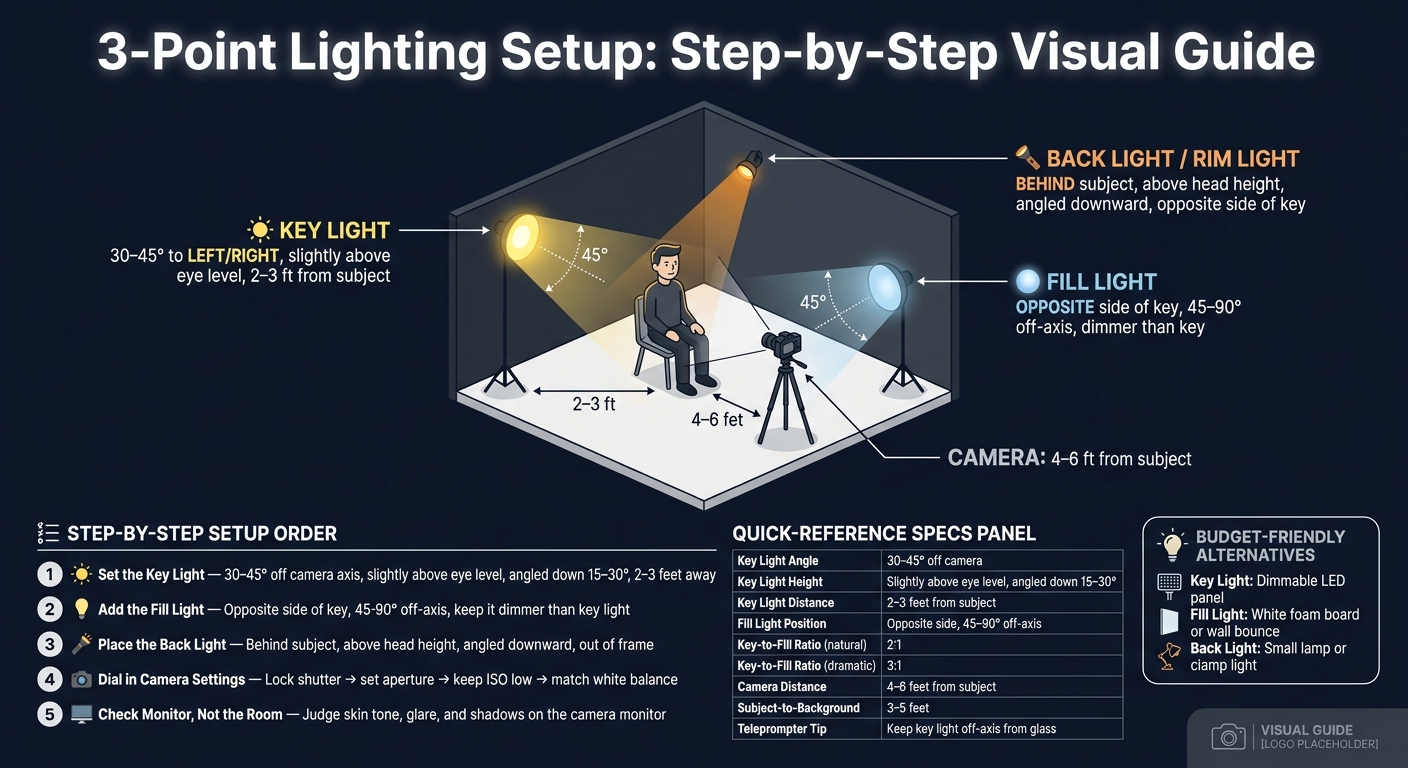
If your video looks flat or shadowy, fix the lights before you fix the camera. I’d start with one light at 30–45° from the camera, place it slightly above eye level, keep it about 2–3 feet from my face, then use a softer fill on the other side and a back light behind me for separation.
Here’s the whole setup in plain terms:
- Key light: main light; place it 30–45° to the left or right of the camera
- Fill light: softer light or bounce; place it on the opposite side
- Back light: behind me, above head height, aimed down
- Camera distance: stand 4–6 feet from the camera
- Background distance: stay 3–5 feet away from the background
- Best order: set key, then fill, then back light
- Good starting ratio: 2:1 key-to-fill for a natural look; 3:1 for more face shape
- Teleprompter tip: keep the key light off-axis so it doesn’t reflect on the glass
What I like about this setup is simple: it gives the face shape, softens shadows, and keeps the subject from blending into the wall. You also do not need costly gear. A dimmable LED, a white foam board, and a small lamp can be enough.
One more thing: I’d trust the camera monitor, not the room, when checking skin tone, glare, and shadow depth. That’s how I’d get a clean talking-head shot without overthinking it.
3-Point Lighting Setup: Step-by-Step Visual Guide
YouTube Lighting Setup for Beginners: 3 Point Lighting Tutorial
sbb-itb-4a26d6a
Set the Key Light First
Start with the key light. It shapes the face and sets the direction for every other shadow in the shot.
Key Light Placement: 30–45 Degrees Off Camera, Slightly Above Eye Level
Place the key light 30–45 degrees to one side of the camera. Left or right both work. Then lift it so it sits slightly above your eye level and angle it down about 15–30 degrees toward your face. That setup gives a talking-head shot some shape without making the lighting feel harsh.
Distance matters just as much. Keep the key light 2–3 feet away for soft, even light that tends to look flattering in talking-head videos. Push it farther back, and the light gets harder with more contrast. A good quick check: look for a small catchlight in your eyes on the camera view. That little reflection usually tells you the light is sitting at a good height.
How to Avoid Harsh Shadows and Teleprompter Glare
If your test shot has shadows that look too sharp, move the key light a few inches closer and add diffusion. You can also shift the light a bit closer to the camera to soften the shadow edge while still keeping some shape on the face.
Using a teleprompter? Check for glare before you move on. Keep the key light off the camera axis and point it at your face, not the glass. If you still catch a reflection, lift the light a few inches or slide it a bit farther to the side. In most cases, small tweaks do the job.
Start at 45 degrees, then fine-tune based on shadow depth and teleprompter glare. When the key light looks clean, add fill to soften the shadows that are left.
Add Fill Light to Control Contrast
Once your key light is in place, use fill to soften the shadow side of the face. The point isn't to wipe shadows out. It's to lower them enough that the image still looks natural on camera.
Fill Light Placement and Brightness Ratio
Put the fill light on the side opposite the key light, usually 45–90 degrees off-axis. Keep it dimmer than the key light so the shadow side stays a bit darker. That slight difference helps keep the face from looking flat and holds onto its shape.
Low-Cost Fill Options: Soft Light, Reflector, or Wall Bounce
You don't need a second fixture to get good fill. A white foam board or reflector on the side opposite the key light can bounce light back onto the shadow side of your face. If there's a white or neutral wall or ceiling nearby, you can bounce light off that instead. In that setup, the wall or ceiling acts like a big, soft source.
For most beginners, white foam board or a wall bounce gives the cleanest low-cost fill.
With the face balanced, move the last light behind the subject for separation.
Place the Back Light for Subject Separation
Once the face looks balanced, set the back light to help the subject stand out from the background.
The back light, also called a rim light, adds a thin line of light along the head and shoulders. That edge helps separate the subject from the background and gives the shot more depth.
Place the back light behind the subject, usually on the side opposite the key light. Set it above head height and angle it downward. Keep the fixture out of frame. To cut lens flare, use barn doors or point the light slightly away from the lens.
The distance between the subject and the background also changes how strong that rim light looks. If you move the subject farther from the background, the edge light will usually show up more clearly.
For talking-head videos, a slightly offset, higher position often gives the cleanest rim light.
Balance the Full Setup and Record a Clean Shot
A Simple Order for Adjusting Lights and Camera Settings
Once your lights are in place, fine-tune the shot in a simple order: key, fill, then back light. That flow keeps things clean and helps you avoid chasing problems from one light to another.
Then use your camera settings to hold the look you built with the lights. Lock the shutter speed first. Set the aperture based on the depth of field you want. Keep ISO low. Then match white balance to the light source. When you check the image, judge skin tones on the monitor, not by how the room looks.
Using a Teleprompter Without Disrupting Your Lighting
After the lighting is balanced, inspect the teleprompter glass for reflections. If the key light hits the glass at a direct angle, that reflection can show up in the lens. A small adjustment usually fixes it: move the key a bit higher and farther to the side, while still keeping it in the 30–45° range.
Soft sources, like large diffused panels, tend to create much less glare than small hard lights. That can save you a lot of hassle.
If you use Evelize, balance lighting first, then check the teleprompter for glare.
A 2:1 key-to-fill ratio looks natural. A 3:1 ratio gives the face more shape.
Key Takeaways from a Basic 3-Point Lighting Setup
After exposure, color, and glare are dialed in, lock the shot and record.
- Set the key light first
- Keep the fill softer than the key
- Use the back light only for separation
- Trust the monitor, not the room
FAQs
What if I only have one light?
You can still get a professional look with just one light. Place it at a 45-degree angle to your face and a little above eye level.
If that setup creates heavy shadows on one side of your face, add a diffuser or softbox to soften the light. That helps you avoid a harsh, uneven look and makes your video in Evelize look cleaner and sharper.
How do I know if my fill is too bright?
Your fill light is probably too bright if the image looks flat or starts to erase the natural depth of your subject’s face.
For a balanced, professional look, set the fill to about half the intensity of the key light. If the face looks uneven, washed out, or low on dimension, the fill is likely fighting the key light instead of simply softening the shadows.
Where should I stand for the best separation?
For cleaner separation from your background, place a backlight behind you and aim it at the back of your head and shoulders. A simple lamp works too, as long as it stays out of frame. That extra light helps you stand out and keeps you from looking like a floating head.
Try to sit about 6 to 10 feet from the camera. That distance tends to give you more natural eye contact and better focus.
Related Posts
Ready to Elevate Your Content?
Try Evelize for free and experience the easiest way to create, edit, and share professional videos. Script writing, teleprompter, and powerful video tools - all in one app!


