Step-by-Step Guide to Instructional Videos
Step-by-Step Guide to Instructional Videos
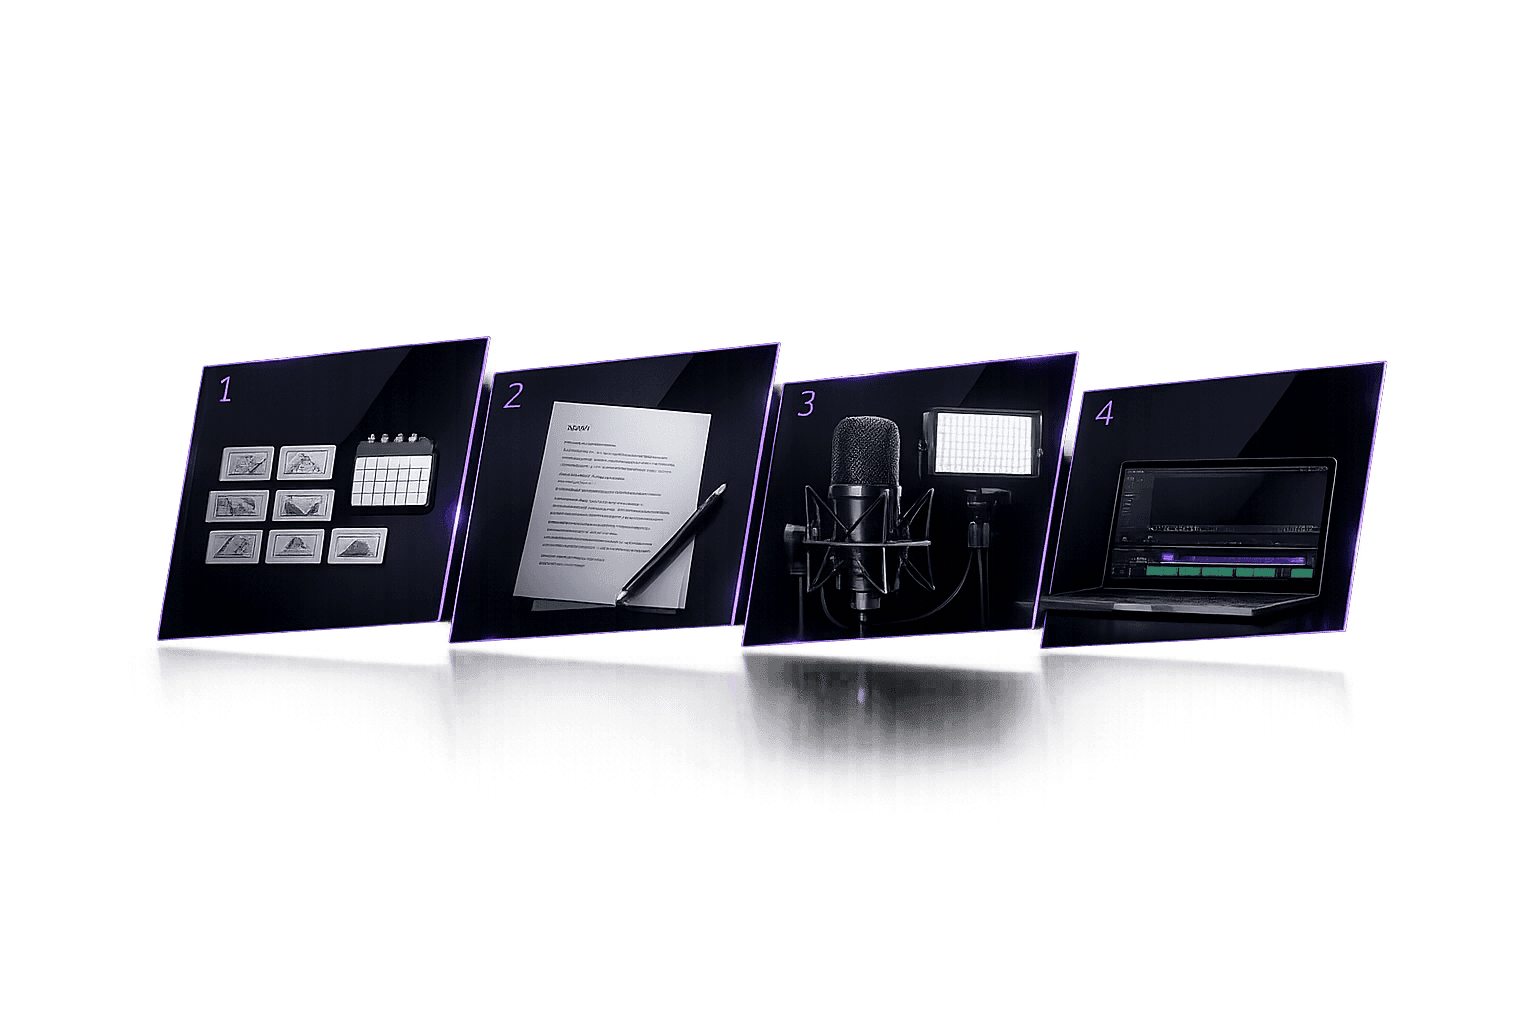
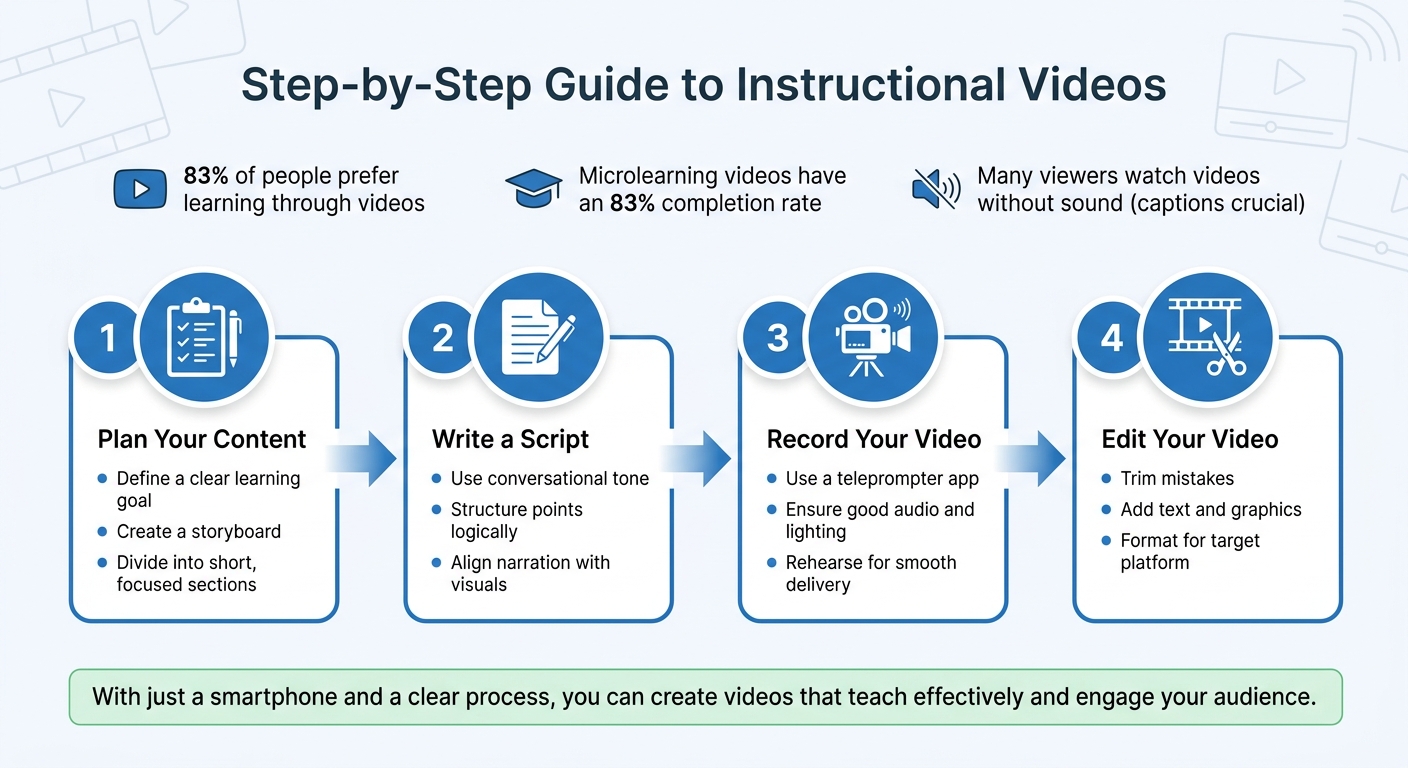
Creating instructional videos is easier than you think. This guide breaks it down into four simple steps:
- Plan Your Content: Define a clear learning goal, create a storyboard, and divide your video into short, focused sections.
- Write a Script: Use a conversational tone, structure your points logically, and align narration with visuals.
- Record Your Video: Use a teleprompter app, ensure good audio and lighting, and rehearse for smooth delivery.
- Edit Your Video: Trim mistakes, add text and graphics, and format for your target platform.
Key Stats:
- 83% of people prefer learning through videos.
- Microlearning videos have an 83% completion rate.
- Captions are crucial since many watch videos without sound.
With just a smartphone and a clear process, you can create videos that teach effectively and engage your audience.
4-Step Process for Creating Instructional Videos
Step 1: Planning Your Video Content
Define Your Learning Goal
Start by establishing a clear, actionable learning goal. Think about what you want your viewers to do after watching your video. A simple formula can help: "After watching this video, the learner will be able to [specific action]." For example, instead of saying, "This video explains our procurement process", try, "The learner will be able to complete a purchase order in the system without errors". The first describes the content; the second focuses on the outcome.
Stick to one objective per video. Trying to cram too much into one video can confuse your audience and dilute the message. As Knowlify puts it:
"Scope creep is the enemy of good training video. If your SME wants to cover six things, help them prioritize the most important one and plan a series".
If you need to cover multiple objectives, break them into separate videos. Write a short paragraph summarizing your video's purpose and main goal. This will act as your "north star", keeping you aligned throughout the process [3, 7].
Create a Storyboard
Once your goal is set, the next step is to map out your video’s structure visually. A storyboard helps you outline each scene before filming. Think of it as a comic strip for your video, with rough sketches showing key moments, camera angles, and visuals.
Start by breaking your script into individual scenes [7, 13]. You can use traditional paper templates or digital tools like Google Slides, which make it easy to rearrange scenes and collaborate [12, 13, 14]. Choose an aspect ratio based on where your video will be shared: 16:9 for platforms like YouTube or 9:16 for Instagram Stories and TikTok.
Keep it simple. You don’t need to be an artist - stick figures work just fine. Luke Leighfield from Boords explains:
"A storyboard is a visual representation of how a story will play out, scene by scene. It's similar to a roadmap, guiding the journey of storytelling from the beginning to the end".
Add arrows to indicate movement, note camera angles (e.g., close-up, medium shot, wide shot), and include any text overlays or graphics you plan to use [12, 14]. Label each shot with technical details, like shot type and number, to stay organized. This preparation can save a lot of time during filming and editing.
Divide Content into Short Sections
Now that your storyboard is ready, it’s time to organize your script into manageable pieces. Break your content into smaller, focused sections. People can only absorb so much information at once, so presenting everything in a single, lengthy video risks overwhelming your audience. Short, targeted sections help viewers process and retain the material.
Research shows that microlearning videos have an 83% completion rate, compared to just 20–30% for longer courses [16, 6]. Each section should teach one concept or action directly tied to your learning goal.
A good rule of thumb: limit your video to six steps. If you need more, consider creating a series. As Sachin Das, Founder of Screen Script, puts it:
"The moment you try to cover everything, you lose everyone".
Short sections also make updates easier. If something changes - like a software interface - you only need to re-record that specific part instead of redoing the entire video.
| Video Type | Recommended Length | Best Use Case |
|---|---|---|
| Micro video | < 1 minute | Teaching a single, narrow feature or concept |
| Tutorial | 2–10 minutes | Step-by-step instructions for a specific task |
| Training Video | 2–6 minutes | Workplace skills, compliance, or onboarding |
| Explainer | 60–90 seconds | Introducing a high-level product or service |
Wrap up each section with a quick recap to reinforce what your viewers just learned [16, 6].
sbb-itb-4a26d6a
Follow These 7 Steps to Make a Great Tutorial Video
Step 2: Writing Your Script
With your plan mapped out and content divided into sections, it's time to write a script that will guide viewers smoothly through your lesson.
Structure Your Main Points
A solid script has three key parts to keep viewers engaged: a hook, core content, and a conclusion. Start with a hook - a 10–15 second opener that presents a relatable problem or scenario. For example, instead of saying, "This video is about project management", try something like, "Ever feel like project deadlines are impossible to manage?" This approach grabs attention and gives viewers a reason to keep watching.
The core content, which makes up the bulk of your video (80–90%), should flow in logical, numbered steps. Use a two-column format - one for "Narration" and the other for "Visuals" - to ensure your audio and visuals align seamlessly.
Wrap it up with a quick summary and a call to action (like "Now try this method on your next project!"). Keep everything focused on the learning objective you defined earlier. Before starting, finish this sentence: "After watching this video, the viewer will be able to [specific action]." If you can't sum it up in one sentence, narrow your focus. As Knowlify puts it:
"A beautifully animated video with a weak script will underperform a simple screencast with a clear, well-paced narrative."
| Script Element | Purpose | Recommended Timing |
|---|---|---|
| Hook | State the problem or outcome to grab attention | 0–30 seconds |
| Prerequisites | Explain what the viewer needs to know beforehand | 30–60 seconds |
| Core Content | Break the process into clear, actionable steps | 80–90% of the video |
| Summary/CTA | Recap key points and suggest next steps | 0–10% of the video |
This structure builds on the storyboard and learning objective you developed earlier.
Write in a Conversational Style
Your script should feel like you're chatting with a colleague, not delivering a formal lecture. Use conversational language, contractions (like "you'll" and "it's"), and an active voice to make it engaging. Keep sentences short - 12–18 words is ideal for smooth delivery. Always read your script aloud to check if it sounds natural; if it feels awkward, simplify or break it into smaller sentences.
Go beyond listing steps - explain the reasoning behind each one. For example, instead of saying, "Click 'Save Settings,'" say, "Click 'Save Settings' in the bottom right so your changes are saved permanently." This extra context makes instructions clearer and more meaningful. Studies show that employees are 75% more likely to watch a video than read written materials like documents or emails.
Use verbal cues like "Next…" or "Then…" to guide viewers through the process. Also, anticipate common mistakes by including tips like, "If you see an error here, it’s probably because you skipped the verification step." For pacing, aim for 150–160 words per minute in your narration.
Add Visual and Interactive Elements
Your script should also serve as a guide for the visuals. In your two-column format, include specific instructions for on-screen actions. For example, in the "Visuals" column, you might write:
Circle the 'Save' button in red
When dealing with small interface elements, consider zoom effects. Instead of saying, "Click the tiny icon in the corner", note:
Zoom in on the API Key field
Visual elements can significantly improve retention - up to 65% compared to 10–20% for text alone. Add on-screen text overlays for critical moments, like step numbers, keyboard shortcuts, or warnings. These reinforcements make the content easier to follow.
Plan deliberate cursor movements, with brief pauses (1–2 seconds) before clicks, and use brackets to time actions precisely (e.g., "Now click [click happens] Settings"). To make your video more engaging, include interactive prompts like asking viewers to pause, download a resource, or answer a question in the comments. These touches encourage active participation instead of passive viewing.
Step 3: Recording Your Video
With your script finalized, it’s time to start recording. This step combines smooth delivery, clear visuals, and professional audio to create a polished video that keeps your audience engaged. Here’s how to fine-tune your recording process for the best results.
Use a Teleprompter App
One of the biggest challenges in recording is memorizing your script. A teleprompter app can solve this problem, allowing you to read your script naturally while maintaining eye contact with the camera. This approach keeps your delivery smooth and helps build trust with your viewers - especially important for training content like leadership or workplace culture.
Evelize (https://evelize.com) is a great option, combining teleprompter functionality with professional recording tools. You can upload your script, adjust the scrolling speed to match your speaking pace (around 130–150 words per minute works well for instructional videos), and tweak the font size and background color for easy readability. The app also supports 4K resolution at 60 FPS with HDR, ensuring crisp, high-quality footage. Plus, its built-in script management system helps you stay organized, making it easy to revise or switch between sections as needed. This setup streamlines the entire process, from planning to recording.
Did you know that learners are 95% more likely to remember information from videos than from text alone? Delivering your script smoothly - without stumbles or constant re-takes - can make a big difference in how well your audience absorbs the material.
Prepare Your Recording Space
Even the best script won’t shine without good audio and visuals. Start by optimizing your recording space. Audio quality is more important than video quality for training videos. Poor sound is one of the main reasons viewers stop watching, so it’s crucial to record in a quiet environment. Silence any devices, minimize background noise, and, if possible, use a dedicated USB microphone for clearer, more professional sound. While laptop mics or AirPods can work in a pinch, they don’t match the clarity of a standalone microphone.
For lighting, natural light often works best. Position yourself facing a window to get soft, even lighting without harsh shadows. If you’re filming a screen-based tutorial, take a few extra steps to create a clean, distraction-free view: close unrelated browser tabs, hide your bookmarks bar, enable "Do Not Disturb" mode, set your browser zoom to 100% for a consistent interface, and slow down your mouse movements - what feels natural to you might look rushed on screen.
Select the Right Video Settings
Choosing the right video settings can elevate your recording quality. 4K resolution is ideal, offering flexibility during editing, especially if you need to crop or zoom in on details. Pair this with 60 FPS for smooth motion, which is particularly useful when demonstrating fast actions or screen interactions. HDR support enhances depth and color, making your visuals stand out without requiring extra post-production work.
At a minimum, aim for 1080p resolution to ensure text and visuals are clear. For audio, use lossless 48 kHz WAV if your software supports it. Before diving into your full recording, do a quick 10-second mic check and play it back to catch any issues early. Use headphones to monitor sound levels in real time and ensure consistent audio quality. These settings lay a solid foundation for a smoother editing process later on.
Step 4: Editing Your Video
Once your recording is done, the editing process is where your raw footage transforms into a polished instructional video. This stage involves cutting out unnecessary parts, adding visuals to reinforce your message, and formatting the video for the platforms your audience uses. Here’s how to fine-tune your footage for maximum impact.
Cut and Refine Your Footage
Start by trimming out false starts, long pauses (over 2–3 seconds), and filler words like "um" or "uh." For smoother transitions, make your cuts during action or speech. If you’re working with screen recordings, increasing the playback speed to around 110–125% can help eliminate awkward silences without affecting clarity.
Pay close attention to audio quality - it’s just as important as the visuals. When mixing audio, aim for these levels:
- Dialogue: Between -12 and -6 dB
- Background music: Between -25 and -18 dB (around 20–30% of full volume)
- Sound effects: Between -15 and -10 dB
Keep in mind, editing typically takes one to two hours for every minute of finished video.
Add Text and Graphics
On-screen text and annotations are great for emphasizing key points. Make sure text overlays stay visible for 3–5 seconds and use a font size of at least 24pt so it’s readable on mobile devices. Since many viewers watch videos without sound, adding captions or auto-generated subtitles is a must for accessibility and engagement.
For instructional videos, consider using cursor effects like highlighting, magnifying, or spotlighting to direct attention to specific parts of the screen. Before adding graphics, adjust the brightness, shadows, highlights, and saturation for a consistent look. Motion graphics, such as lower thirds, can also help identify speakers or highlight important points without overwhelming the viewer.
Format for Different Platforms
After editing and adding graphics, format your video to fit the requirements of your target platforms. Tools like Evelize (https://evelize.com) offer presets for social media, automatically adjusting your video for different platforms to save time and maintain a professional look. Shooting in 4K is a smart choice - it allows you to crop and resize for various aspect ratios without sacrificing quality.
| Platform | Aspect Ratio | Resolution |
|---|---|---|
| TikTok, Instagram Reels, YouTube Shorts | 9:16 (Vertical) | 1080 x 1920 |
| YouTube (Standard) | 16:9 (Widescreen) | 1920 x 1080 |
| Instagram Feed | 4:5 | 1080 x 1350 |
| 1:1 or 9:16 | 1080 x 1080 / 1080 x 1920 |
To avoid key visuals or text being hidden by platform interfaces (like TikTok’s sidebar or Instagram’s captions), keep them within the "safe zones." Finally, export your video in MP4 format using the H.264 codec - this ensures compatibility across most social platforms. These steps will prepare your video for review and, ultimately, distribution.
Conclusion
Review of the 4 Steps
Creating effective instructional videos boils down to following a straightforward four-step process. First, during the planning stage, define a clear learning objective and use a storyboard to ensure your content flows logically. Next, when scripting, aim for a conversational tone. Structure your script with an engaging introduction, a clear step-by-step explanation, and a concise conclusion. For the recording phase, focus on quality audio by using an external microphone, set up in a quiet and well-lit space, and rehearse your delivery for a natural feel. Lastly, in the editing phase, remove any mistakes to keep your video between 2–6 minutes long, add visual aids like text overlays or arrows, and include captions - an essential step, as nearly half of viewers watch videos without sound.
Once you’ve mastered these basics, consider incorporating some additional strategies to make your videos even better.
Additional Tips for Better Videos
Small adjustments can make a big difference in the quality of your videos. Pay close attention to viewer feedback and analytics to see where your audience might lose interest or feel confused, and tweak your approach accordingly. Avoid common pitfalls like prioritizing expensive equipment over content quality, making videos unnecessarily long, or neglecting audio clarity. Adding on-screen text and graphics can also help keep your audience engaged and improve retention. As Hannah Tow, a former voiceover professional, puts it:
"Make sure to match your tone of voice to the script. If you're reading something serious, your inflection conveys authority. Your goal is to sound natural."
By refining these elements, you’ll be well on your way to producing more polished and engaging videos.
Start Creating Your Videos
You don’t need fancy equipment to get started - a smartphone and a basic USB microphone can do the job. Begin with a single, specific topic per video and improve your process as you go. With 83% of people preferring video over text for learning, there’s no better time to share your knowledge. Tools like Evelize (https://evelize.com) can simplify your workflow by offering features like teleprompter functionality, 4K recording, and social media presets that format your videos for various platforms.
Stick to the four-step process - plan, script, record, edit - as your foundation. Start small, gather feedback, and fine-tune your skills with each video you create.
FAQs
What makes a good learning goal for an instructional video?
A strong learning goal spells out exactly what skills or knowledge viewers will acquire after watching a video. It should be measurable and use precise, action-oriented verbs like "create," "define," or "list." Avoid using vague terms such as "understand," which are harder to track or observe. Sticking to two or three focused objectives keeps the content manageable and ensures it aligns with the video’s purpose, giving learners clear and achievable targets.
How long should my instructional video be for best results?
The sweet spot for instructional videos tends to be around 8–12 minutes. This length strikes a balance between being thorough enough to explain the topic and short enough to keep viewers engaged. Focus on keeping the content clear, engaging, and to the point. The goal is to cover the material effectively without overwhelming or losing your audience's attention.
What’s the easiest way to get clear audio and lighting at home?
To ensure clear audio and proper lighting at home, start by choosing a quiet space for recording. When it comes to audio, consider using a lavalier, shotgun, or USB microphone - these are great for minimizing background noise and capturing clean sound. For lighting, a three-point setup is ideal. This typically involves LED panels, ring lights, or softboxes to evenly illuminate your subject.
For a polished appearance, position your camera at eye level and carefully frame your shot. These small adjustments can make a big difference in creating a professional and visually appealing setup.
Related Posts
Ready to Elevate Your Content?
Try Evelize for free and experience the easiest way to create, edit, and share professional videos. Script writing, teleprompter, and powerful video tools - all in one app!
