How to Set Focus for Teleprompter Videos

How to Set Focus for Teleprompter Videos
Getting the focus right in teleprompter videos is critical for making your message clear and trustworthy. Even minor focus issues - like blurry visuals or visible eye movement - can distract viewers and reduce your credibility. Here’s what you need to know:
- Teleprompter Basics: Use beam-splitter glass at a 45° angle to reflect your script while keeping the camera view clear. Ensure the glass is properly angled to avoid reflections or ghosting.
- Camera Setup: Smartphones are simple to use, but DSLRs and mirrorless cameras offer sharper image quality. Position the lens directly behind the teleprompter glass and ensure proper centering.
- Distance and Positioning: Keep a distance of 6–10 feet between you and the camera. This minimizes noticeable eye movement while reading and maintains natural eye contact.
- Lighting: Use soft, angled lighting to avoid glare on the teleprompter glass. Dark mode on your teleprompter app can also reduce reflections.
- Focus Techniques: Lock focus on your face to avoid shifts during recording. For DSLRs, use face/eye detection autofocus or manual focus with tools like focus magnification and peaking.
- Script Formatting: Use narrow, centered text columns with large fonts (36pt+) and scroll at ~150 words per minute to maintain a steady gaze.
These steps ensure your teleprompter videos look polished and professional, helping you connect with your audience effectively.
Understanding Your Teleprompter Setup and Camera
How Teleprompters Work
Teleprompters rely on a clever design: a beam-splitter glass set at a 45° angle in front of the camera lens. Below this glass, a monitor or tablet displays your mirrored script, which reflects upward, allowing you to read it while looking directly at the camera. The semi-transparent glass ensures the camera can still capture you clearly as you speak.
Most teleprompter glass uses a 70/30 ratio - 70% of the light from the scene passes through to the camera, while 30% reflects your script toward you. This balance keeps your footage sharp while making the text easy to read. To ensure the script displays correctly, you'll need to horizontally mirror the text.
"The glass should be completely invisible in your footage. If you're seeing reflections or text ghosting in your video, the glass isn't angled correctly or the room behind the prompter isn't dark enough." - Digital Filmmaker
Understanding this setup is key to pairing it with the right camera for optimal results.
Camera Types and Focus Modes
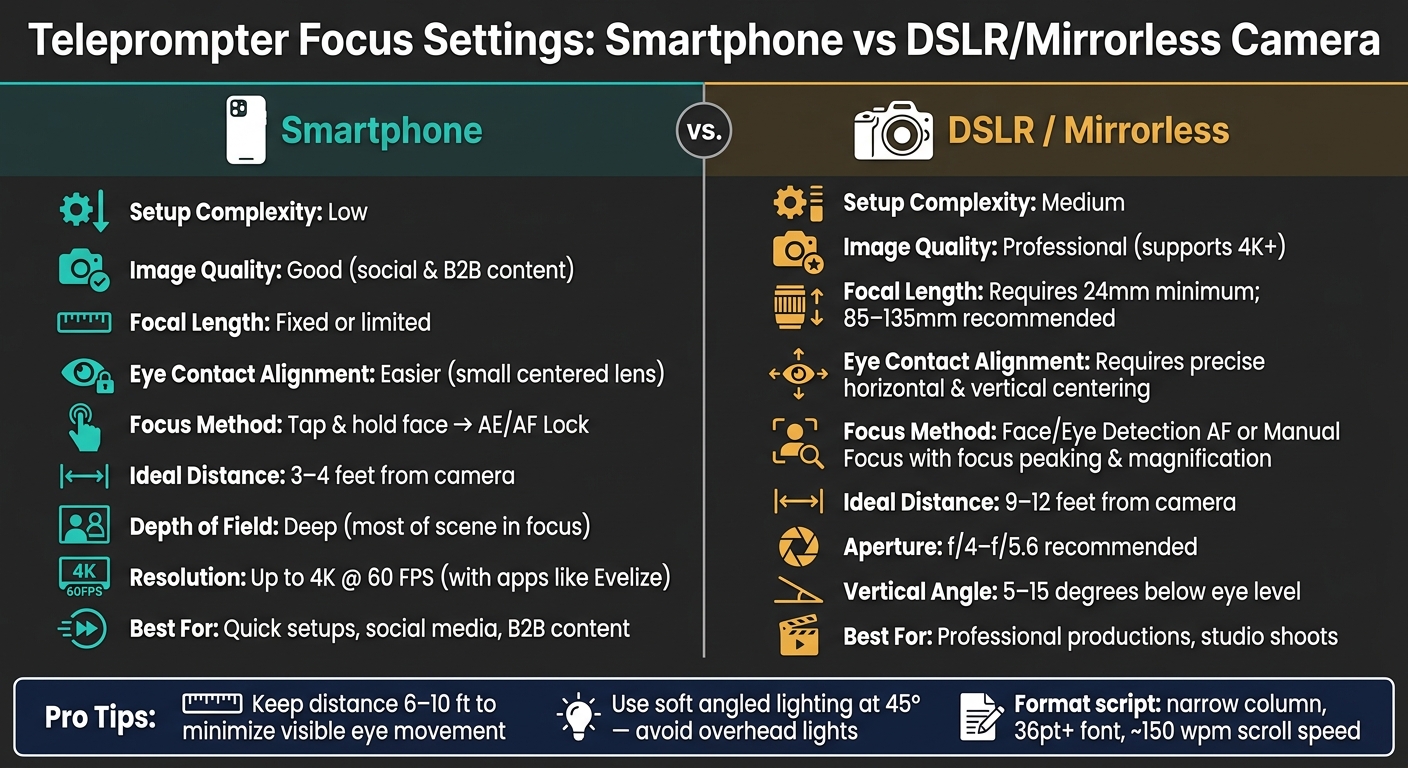
Now that you understand how teleprompters work, selecting the right camera and focus mode becomes the next step. Smartphones, with their small, centered lenses and reliable autofocus, are straightforward to use. On the other hand, DSLRs and mirrorless cameras offer superior image quality and greater control but require a more precise alignment. The lens must be centered both horizontally and vertically behind the teleprompter glass, and a focal length of at least 24mm is needed to avoid capturing the edges of the teleprompter frame.
| Feature | Smartphone | DSLR / Mirrorless |
|---|---|---|
| Setup Complexity | Low | Medium |
| Image Quality | Good for social and B2B content | Professional; supports 4K+ |
| Focal Length | Fixed or limited | Requires 24mm+ |
| Eye Contact Alignment | Easier due to small lens | Requires precise centering |
When it comes to focus modes, modern mirrorless cameras equipped with Face/Eye Detection autofocus excel at maintaining sharp focus, even if you move slightly. For smartphones, tapping the screen to lock focus on your face before recording is a simple and effective solution.
Camera Distance and Positioning
The final piece of the puzzle is ensuring your camera is positioned at the right distance and angle. A typical teleprompter setup works best with a distance of 6 to 10 feet between the presenter and the camera. At this range, your eye movements while reading remain subtle, preserving the illusion of direct eye contact with viewers. Getting too close - closer than 6 feet - can make your eyes visibly track the text, breaking that illusion.
Readability also depends on distance. For smartphone or tablet-based teleprompters, the text remains legible up to about 10 feet. Beyond that, the text may appear too small, leading to squinting and affecting your delivery. If you need to stand farther back, a larger display will be necessary.
"When it's closer it's easier for you to read the script, but viewers are more likely to see your eyes move as you do and your face will lose perspective." - Charles Callaway
With your teleprompter, camera, and positioning sorted, you're well on your way to achieving a polished and professional on-camera presence. Next, it's time to fine-tune your scene for consistent, reliable focus.
sbb-itb-4a26d6a
Setting Up the Scene for Accurate Focus
Achieving sharp focus starts with careful preparation of your scene.
Camera and Teleprompter Placement
Aligning your camera and teleprompter correctly is essential for maintaining consistent focus. The camera lens should sit directly behind the center of the beam-splitter glass. Even being off by 1–2 inches can cause a distracting off-axis appearance. Position the lens as close to the back of the glass as possible to avoid vignetting, where the edges of the teleprompter frame intrude into the shot.
"Keep the lens as close to the back of the glass as possible. This minimizes vignetting and keeps the frame clean." - Martin Eagleman, Teleprompter Specialist, TeleprompterPAD
Make sure the rig is mounted at eye level. Use a lens with at least a 24mm focal length for general use, but if you're aiming for a polished, professional look, opt for an 85–135mm focal length. This range helps compress eye movements for a more natural appearance. Once your camera and teleprompter are aligned, you can move on to refining your lighting setup.
Lighting for Reliable Focus
Proper lighting is key to reducing glare and ensuring sharp focus. Position your key light at a 45° angle to the side, and use softboxes or diffusers to soften the light. Avoid using overhead lights, as they can create unwanted reflections on the beam-splitter glass.
"If overhead lights are hitting the glass, you'll get glare. Kill those overhead lights or reposition." - Martin Eagleman, Teleprompter Specialist, TeleprompterPAD
Switching your teleprompter app to dark mode can also make a big difference. A black background with light gray or off-white text reduces the screen's light output, which minimizes lens glare and keeps the reflected text crisp and easy to read.
Stabilizing Your Setup
Once you've optimized placement and lighting, it's crucial to stabilize your equipment to maintain focus throughout your shoot. Use a sturdy tripod to mount your rig, and secure the tripod legs with sandbags to prevent any movement during filming.
"Sand bags can help provide more structural integrity to the set if it is heavier on one side [and] can also help avoid any unwanted movement during filming." - TeleprompterPAD
To streamline your workflow, mark the exact eyepoint on the teleprompter frame with low-tack tape or a visible marker. This helps you quickly reset your position between takes, ensuring consistency throughout your recording session.
Focus Setup for Smartphones: Step by Step
Using a smartphone as a teleprompter tool can be incredibly effective, but autofocus can sometimes be unreliable. Here’s how to take control of your focus before you hit record.
Locking Focus on the Presenter
To ensure your smartphone stays focused on you during recording, tap and hold on your face on the screen until you see the AE/AF Lock indicator. This action disables the continuous autofocus, preventing it from shifting due to small movements. For the best results, position yourself about 3–4 feet from the camera - this distance minimizes noticeable eye movements between the script and the lens.
"The farther your phone is from the lens, the more noticeable your eye movement becomes. For most setups, position yourself about 3–4 feet from the camera." - Speakflow
Before starting, record a quick 10-second test clip to confirm that your framing and focus are spot-on.
Depth of Field on Smartphones
Smartphones tend to create a deep depth of field, meaning most of the scene will stay in focus. While this ensures your face appears sharp, it also means that any cluttered background will be equally visible. To maintain a polished look, keep your background clean and uncluttered.
Lighting also plays a key role. Use a ring light or diffused natural light to highlight your facial features evenly and professionally. Once you’ve got the focus and depth set, you can use built-in tools for even more control.
Using Evelize for Smartphone Focus
Evelize offers an all-in-one solution for managing focus and recording settings. With its built-in camera controls, you can lock focus and fine-tune your recording parameters, such as 4K resolution at 60 FPS, ensuring crisp footage even if you need to crop or reframe during editing.
The app also allows you to adjust the aspect ratio (Landscape, Portrait, or Square) and choose your recording codec directly, making it easy to maintain consistent settings across multiple takes. This streamlined approach keeps your focus where it belongs - on delivering your script seamlessly.
Focus Setup for DSLRs and Mirrorless Cameras: Step by Step
Smartphone vs DSLR/Mirrorless Camera Settings for Teleprompter Videos
DSLRs and mirrorless cameras let you fine-tune focus in ways smartphones just can't match. To get the best results, though, you need to set them up carefully.
Autofocus Techniques
Most modern mirrorless cameras - like those from Sony, Canon, and Nikon - offer face and eye detection autofocus, which is ideal for teleprompter setups. Turn on this feature and select a wide or zone-based focus area mode to ensure your face stays sharp. Position the camera about 9–12 feet from the presenter. At this distance, the autofocus system can lock onto a clear target, and small head movements won’t throw the focus off.
Manual Focus Tips
If your autofocus has trouble keeping up with subtle movements, manual focus can give you more control. Use your camera's focus magnification to zoom in on the presenter’s eyes in the live view display, then adjust the focus ring until the eyes are tack-sharp. Activating focus peaking can also help by highlighting the sharpest edges as you fine-tune.
Once the focus is set, mark the presenter’s position on the floor with tape so they can return to the same spot between takes. This ensures they stay within the depth of field. To double-check your setup, record a 30-second test clip and review it on a larger screen. Small imperfections, like subtle softness caused by teleprompter glass, are easier to spot on a bigger display.
"Lens choice: Full-frame 85–135mm (or 50–85mm on Super35) to compress micro eye movement." - St Louis Video & Photo
Using a longer focal length (85mm or more) helps stabilize focus by minimizing noticeable eye movement.
Balancing Depth of Field
After you’ve nailed the focus using either autofocus or manual settings, it’s time to adjust the aperture to control depth of field. Many creators get tempted by the cinematic look of shooting wide open at f/1.8, but this can backfire. Even slight movements - like leaning forward or backward - can put the presenter out of focus. For solo teleprompter setups, a mid-range aperture like f/4 to f/5.6 is a safer bet. It keeps the presenter sharp while allowing for slight natural movements and still delivers a clean, slightly blurred background.
Want that shallow depth-of-field look without risking focus issues? Combine a moderate aperture with a longer lens and increased camera distance. This method, used in professional studios, creates beautiful background separation while keeping the frame predictable and polished.
| Factor | Recommendation | Why It Matters |
|---|---|---|
| Focal Length | 85mm–135mm (Full Frame) | Reduces visible eye movement; softens background |
| Subject Distance | 9–12 feet | Keeps eye movement less noticeable on glass |
| Aperture | f/4–f/5.6 | Maintains focus despite minor movements |
| Vertical Angle | 5–15 degrees below eye level | Reduces eye strain; ensures consistent focus plane |
Keeping Focus Sharp During Recording
Even with the best camera settings and setup, staying in sharp focus throughout a recording can be tricky. Small movements - like leaning, drifting, or tilting - can pull the presenter out of focus mid-shot. Let’s dive into some practical techniques to ensure you remain in focus during every take.
Focusing on the Presenter, Not the Text
Teleprompters equipped with beam-splitter glass reflect the script for the presenter while staying transparent to the camera. This clever design ensures the camera only captures the presenter’s face, provided the text aligns with the eyepoint - the exact spot in line with the lens.
"The eyepoint provides a precise focal spot, directly in line with the camera lens, which the presenter uses to keep eye contact steady and believable." - Beverly Boy Productions
To maintain natural eye contact, position the teleprompter screen as close to the lens as possible and align it at the same height. Once this setup is in place, the focus shifts to managing natural movements to keep them from interfering with the shot.
Eye-Line and Presenter Positioning
The distance between the presenter and the camera plays a big role in how noticeable movements appear. When the presenter is 8–10 feet away, small head or eye shifts are much less visible to the audience. On the other hand, standing closer magnifies even minor movements, which can also cause modern cameras to hunt for focus.
Position the camera at or slightly above eye level. This helps keep the presenter’s head in a neutral, relaxed position, reducing the chance of drifting out of focus. For an extra trick, place a small colored sticker or piece of low-tack tape on the teleprompter frame to mark the eyepoint. If the presenter shifts during a long take, this visual cue makes it easy to re-center their gaze without disrupting the flow.
Script Formatting and Scroll Speed
The way a script is formatted directly affects how still the presenter remains. Wide blocks of text force the eyes to move side to side, which can lead to noticeable autofocus shifts away from the presenter’s eyes.
"When it's closer it's easier for you to read the script, but viewers are more likely to see your eyes move as you do." - Charles Callaway, Documentation Author
To avoid this, keep the text in a narrow, centered column and break it into short sentences - 15 words or fewer is ideal. Frequent line breaks also help keep the presenter’s gaze fixed on the lens.
As for scroll speed, aim for about 150 words per minute. This pace feels natural for speaking while being slow enough to prevent the presenter from “chasing” the text with their head. Always calibrate the scroll speed by reading the script aloud - silent reading tends to be faster and can result in a scroll speed that’s too quick for on-camera delivery.
| Formatting Element | Recommended Setting | Why It Matters |
|---|---|---|
| Column Width | Narrow and centered | Prevents left-to-right eye movement |
| Sentence Length | 15 words or fewer | Reduces head scanning and searching |
| Font Size | 36pt or larger | Eliminates squinting and leaning in |
| Scroll Speed | ~150 wpm | Matches natural speech; prevents "chasing" |
Using Evelize for Consistent Focus and Professional Videos
Evelize combines sharp focus with script and video setting integration, creating a seamless workflow for producing professional-quality videos. By housing camera controls and script management in one interface, it eliminates the interruptions caused by switching between apps during recording sessions.
Configuring Camera Settings in Evelize
With Evelize's recording interface, you can simultaneously read your script and capture video. If you're using the Pro plan, you can record in 4K resolution at 60 FPS with HDR support, ensuring your videos retain every detail. To maintain consistency, lock the focus on the presenter's face before starting the script scroll, preventing any unwanted focus shifts during the shoot.
Adjusting Teleprompter Settings in Evelize
Evelize provides full control over teleprompter settings to keep the presenter steady and natural on camera. Set the font size to at least 36pt, use 1.5x line spacing, and adjust margins to a narrow width - these tweaks help maintain steady eye movement. The Voice Sync feature is a standout, as it matches the script's scroll speed to the presenter's speaking pace, ensuring the text flows naturally with their delivery rather than dictating it.
Organizing Scripts with Evelize
Evelize's script management features let you break your script into manageable lines and include helpful cues like [pause] or [breath]. This structure keeps the presenter's eyes centered on the camera, reducing distractions and improving delivery.
"Recording a video without a teleprompter is like sailing without a compass." - Teleprompter.com
This quote highlights how critical an organized script is to a smooth recording process. A cluttered or disorganized script can create unnecessary friction, which often translates into less polished final takes.
Conclusion: Key Steps for Sharp Teleprompter Videos
Creating sharp teleprompter videos boils down to mastering a few essential practices and sticking to them. Start by positioning your camera lens at eye level and keeping a distance of 8 to 10 feet (2.5 to 3 meters) from the teleprompter. A stable setup, anchored by a sturdy tripod, is critical for ensuring steady and focused shots. These foundational steps, outlined earlier, set the stage for professional-quality results.
Lighting and script formatting also play a significant role. Use front-facing lighting to eliminate shadows that can distract viewers, and format your script with a large, clear font to minimize eye strain. Research even suggests that maintaining consistent eye contact can increase viewer retention by 27%.
Before hitting record, do a full dry run to check the scrolling speed - aim for around 150 words per minute. This helps you stay natural, avoiding any awkward squinting or leaning toward the teleprompter.
"A well-used teleprompter doesn't create robotic delivery. Bad technique does." - Amir Arsalan Sharifi, Founder, PEESHEE Ai
For an added edge, consider incorporating advanced tools into your workflow. Tools like Evelize offer features such as 4K recording at 60 FPS, voice-activated scrolling, and smart script management with built-in pause markers. These features help reduce interruptions and ensure smoother, more consistent results every time you record.
FAQs
Why does my teleprompter video look soft even when I focus on my face?
If your video looks a bit blurry, it might be because the camera's autofocus is having trouble locking onto your face, especially when you're reading up close. A simple fix? Switch to manual focus to keep things sharp. Another culprit could be uneven lighting or reflections bouncing off the teleprompter glass, which can mess with the camera sensor. Adjust your lighting setup to minimize glare and boost overall clarity.
Should I use autofocus or manual focus for teleprompter videos?
Always use manual focus when recording teleprompter videos. This approach ensures your subject stays sharp throughout the entire shoot, eliminating the distracting focus shifts or "hunting" that autofocus can cause. Take a moment to set your focus manually before you start recording to maintain consistent quality and give your video a polished, professional feel.
What camera and lens settings reduce visible eye movement?
To reduce noticeable eye movement, opt for a longer lens - such as an 85–135mm on a full-frame camera or a 50–85mm on a Super35 sensor. This helps compress subtle eye movements. Position the camera further away from the presenter while maintaining a close, intimate framing using the longer focal length. Additionally, ensure the script is aligned with the lens's optical center to prevent the presenter from appearing shifty.
Related Posts
Ready to Elevate Your Content?
Try Evelize for free and experience the easiest way to create, edit, and share professional videos. Script writing, teleprompter, and powerful video tools - all in one app!
