
Top 7 Tools for Perfect Video Exposure
Top 7 Tools for Perfect Video Exposure
Bad exposure makes video look off in seconds. If your face is too bright, skin detail is gone. If it’s too dark, the shot looks flat. And once highlights clip, you can’t bring that detail back.
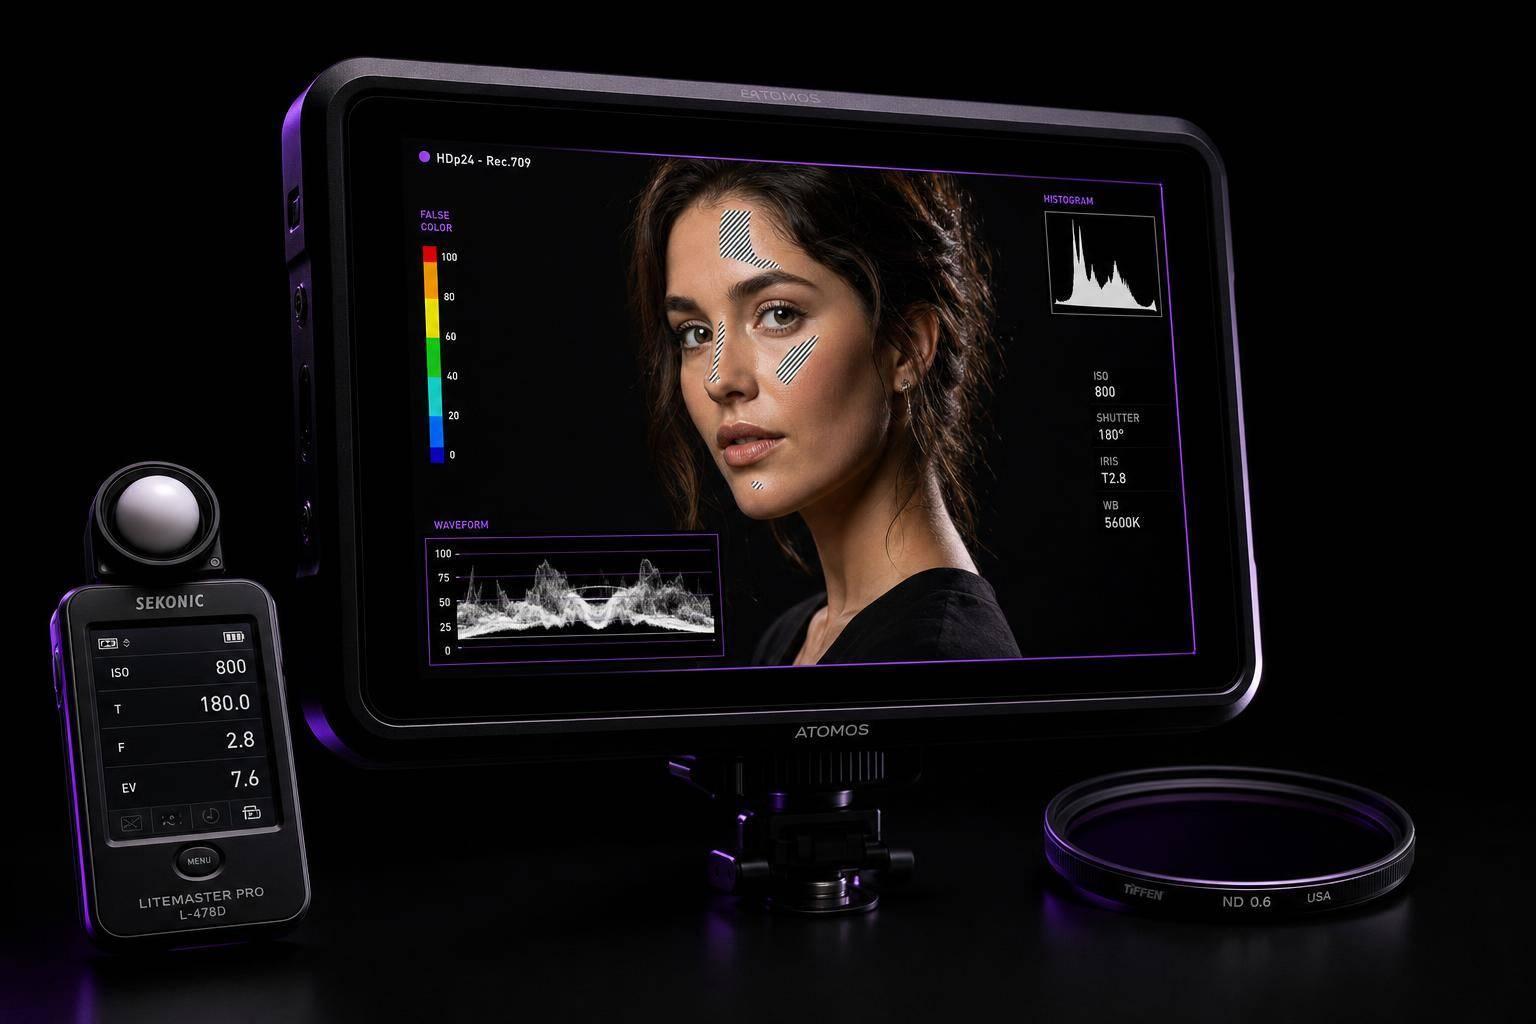
If I had to sum up the article in one line, it’s this: I get the best results when I stop guessing and use a few simple exposure tools together. The seven tools here each solve a different problem:
- Evelize: keeps scripted takes and framing steady
- Histogram: shows overall brightness spread
- Waveform monitor: shows where brightness sits in the frame
- False color: helps me check skin tone fast
- Zebra patterns: warns me when highlights get too hot
- ND filters: cut light in bright sun without changing shutter speed
- Handheld light meter: gives me a repeatable baseline for studio or repeat shoots
A few numbers matter right away:
- Skin in SDR often sits around 60 to 70 IRE
- Clipping starts around 100 IRE
- A common shutter rule is double the frame rate
- That means:
- 24 fps → 1/50 sec
- 30 fps → 1/60 sec
- 60 fps → 1/120 sec
- 120 fps → 1/240 sec
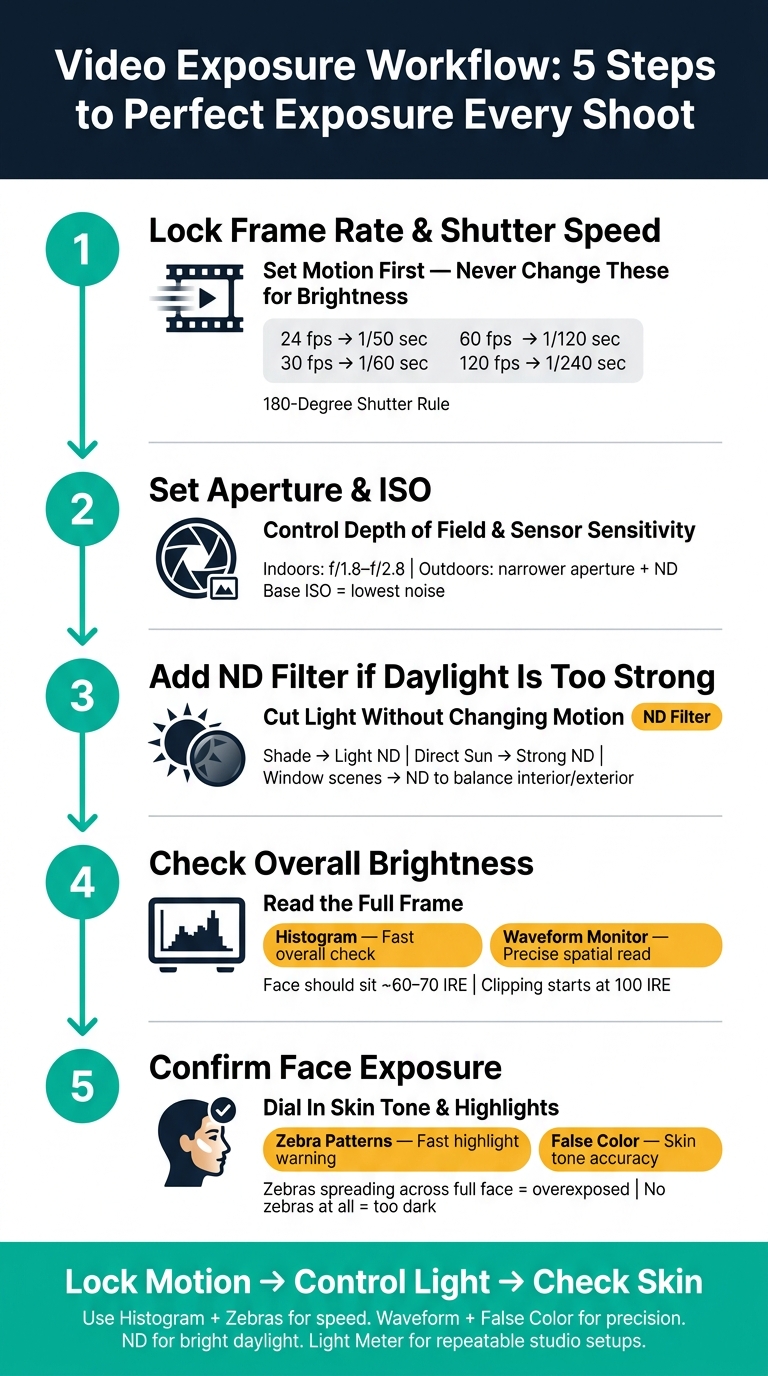
My short process is simple:
- Lock frame rate and shutter speed
- Set aperture and ISO
- Add ND if daylight is too strong
- Check brightness with histogram or waveform
- Confirm face exposure with zebras or false color
That’s the whole game: steady motion, controlled light, and natural-looking skin from shot to shot.
Video Exposure Tools Explained So Anyone Can Use Them
sbb-itb-4a26d6a
Quick Comparison
| Tool | What I use it for | Main issue it helps stop | Best fit |
|---|---|---|---|
| Evelize | Scripted recording and steady framing | Exposure shifts across takes | Teleprompter videos |
| Histogram | Fast brightness check | Overexposed or underexposed frames | Fast shoots outdoors |
| Waveform monitor | Precise frame-by-frame brightness read | Bright backgrounds or uneven exposure | Studio and multi-camera setups |
| False color | Face and skin-tone checks | Skin too bright, dark, or uneven | Log, HDR, or window-lit scenes |
| Zebra patterns | Highlight warning | Clipped foreheads, shirts, windows | Run-and-gun shooting |
| ND filter | Light control in sun | Forced overexposure outdoors | Daylight shooting |
| Handheld light meter | Repeatable setup baseline | Guesswork between shoot days | Interviews, podcasts, studio work |
If you want the short answer: histogram and zebras are good for a fast check, waveform and false color give tighter control, ND fixes bright daylight, and a light meter helps me match setups later. The rest of the article explains how to use them without making exposure harder than it needs to be.
What Good Video Exposure Actually Looks Like
Good exposure does not mean making the image as bright as possible. It means holding onto natural skin tone and bright-area detail from one frame to the next.
ISO, Shutter Speed, and Aperture in Simple Terms
ISO, shutter speed, and aperture work as a team.
ISO changes how sensitive the sensor is to light. Turn it up, and the image gets brighter, but you’ll also see more grain. Shutter speed sets how long each frame gets light. A slower shutter brightens the image, but it also adds more motion blur. Aperture controls how wide the lens opens. A wide aperture, like f/1.8, lets in more light and gives you a blurrier background. A narrow aperture, like f/8, keeps more of the scene in focus but lets in less light.
In low light or indoors, a wide aperture such as f/1.8–f/2.8 helps keep ISO lower and makes your subject stand out from the background. Outside in bright sun, a narrower aperture plus an ND filter gives you more control and helps protect highlight detail.
Common Frame Rate and Shutter Speed Pairings
In video, shutter speed also shapes how motion feels. The 180-degree shutter rule means using a shutter speed that’s about double your frame rate. That gives motion blur that feels natural, not jittery or harsh.
| Frame Rate | Recommended Shutter Speed |
|---|---|
| 24 fps | 1/50 s |
| 30 fps | 1/60 s |
| 60 fps | 1/120 s |
| 120 fps | 1/240 s |
Once you choose your frame rate, it usually makes sense to lock shutter speed for motion. Then use aperture, ISO, or ND filters to handle brightness. With shutter speed fixed, the next step is making sure the image is exposed the way you want.
Why Skin Tone and Highlight Detail Matter Most
People notice faces first. Even a small shift in skin tone - too pale, too orange, a little too bright - jumps out right away. That’s why many cinematographers use skin tone as the main point of reference for exposure instead of judging the whole image by brightness alone.
Highlight detail matters for another reason: once highlights are clipped, they’re gone. A shot that looks a bit darker on your monitor but still keeps texture in bright parts of the frame gives you more room in post than a brighter shot with blown-out highlights.
Why Consistency Matters More Than One Perfect Shot
Getting exposure right in one take is helpful. Keeping it steady across every take, angle, and format is what saves time in the edit.
If one clip is brighter or cooler than the next, matching them later becomes a headache. And this gets even more annoying when you’re turning one shoot into multiple formats. If you lock in settings that work and stick with them, the whole process gets smoother.
These are the targets the tools below help you check and keep steady.
1. Evelize
Evelize is a teleprompter app with built-in recording, so it’s a solid place to start for scripted video shoots. Its 4K recording keeps more fine detail, which gives you more room to crop and tweak shots in post. HDR also helps hold detail in both bright and dark parts of the frame. SDR gives you less room to recover blown highlights. So if you need script control and a steady exposure starting point, Evelize fits the job well.
When scroll speed, font size, and text placement are dialed in, your head stays in a more consistent spot from take to take. That matters more than people think. Less movement means exposure is easier to repeat, especially across multiple takes.
In practice, that makes the setup pretty simple:
- Lock exposure once
- Run a short test take
- Check that skin tones look natural
- Make sure highlights aren’t clipping
After the framing and delivery look steady, confirm exposure with a measurement tool.
2. Histogram
A histogram shows how brightness is spread across your image, from dark areas on the left to bright areas on the right. It gives you a fast first look at face exposure and whether your highlights are in danger.
Watch for clipping. If the graph is pressed hard against either edge, detail is gone. A spike on the far right means blown-out highlights. A heavy pile-up on the far left means shadows have been crushed into flat black. For most talking-head or vlog setups, the main chunk of the data should sit a bit right of center. That’s usually where skin tones and general scene detail fall.
The main idea is simple: keep the parts that matter most, especially faces, away from the far edges.
In log or HDR modes, some histograms show the preview image, not the final recorded signal. So treat them as a guide, not your last word.
Use the histogram for a first pass, then fine-tune skin exposure with zebra patterns or false color.
3. Waveform Monitor
For talking-head and teleprompter shots, a waveform gives you spatial detail that a histogram just can't. It shows where brightness is too high or too low in the frame, not just how tones are spread overall. Because the horizontal axis matches the frame from left to right, you can check the exact part of the image where your subject is sitting.
The vertical axis is measured in IRE, with 0 IRE for black and 100 IRE for white. In SDR, skin often falls around 60 to 70 IRE. Darker skin may read lower, but it should still stay above the point where shadow detail starts to disappear.
A flat line at the top usually means your highlights are clipped. So if that line shows up next to a bright window, you've got a clear clue about what's blowing out and where to fix it.
Waveforms are especially useful for:
- complex lighting setups
- matching multiple cameras
- log or HDR shoots
After that, false color or zebras can help you confirm face exposure more quickly.
Many mirrorless cameras and external monitors now come with built-in waveform displays. On an external field monitor, the bigger screen makes the waveform much easier to read during a live shoot.
4. False Color
When you need a fast, at-a-glance exposure check, false color is a great tool. It maps exposure levels to colors, so you can spot clipping, skin tone, and shadow detail right away.
The color-to-brightness mapping is based on the IRE scale. Exact colors can change a bit by manufacturer, but the general logic stays about the same across brands:
| IRE Level | Common Color | What It Means |
|---|---|---|
| 100+ | Red / White | Clipping - detail is gone |
| 90–99 | Yellow / Orange | At risk of clipping |
| 60–70 | Light Gray / Pink | Ideal range for lighter skin tones |
| 40–55 | Green / Pink | Middle gray / darker skin tones |
| 10–20 | Deep Blue | Near-black shadow detail |
| 0–8 | Purple / Blue | Crushed blacks - underexposed |
Check the legend on your monitor, then make sure the face falls into the right band before you roll. That’s the big win with false color: unlike a histogram, it shows where the exposure issue sits in the frame.
So if skin is too hot, the sky is clipped, or one corner is too dark, you’ll see it fast.
For talking-head shots, turn on false color and adjust aperture, ISO, or ND until the face lands in the target color band. If you’re shooting in log mode, load the correct preset first, then set exposure.
5. Zebra Patterns
Zebra patterns are diagonal stripes that your camera places over the image in real time. They flag any area that hits your warning level. Use them as a fast on-the-spot check after you’ve looked at waveform or false color.
A simple setup works well:
- Set one zebra level around 70 IRE to keep an eye on facial highlights
- Set another at 95–100 IRE to spot clipping on windows, skies, and white shirts
If the stripes spread beyond the brightest points on the face, the shot is overexposed. In plain English, you’ve pushed things too far. Close the aperture, lower the ISO, or add an ND filter until the stripes pull back and sit only on the peak highlight areas.
Outdoors, zebras can save you from bad calls because LCD screens are tough to read in bright sunlight. A face may look fine on-screen, but the forehead could already be clipping. That’s why it’s smart to test your zebra threshold before the shoot. Camera behavior varies, and small differences can throw you off.
If you’re shooting in log, pair zebras with false color for a better read. And if stripes still show up in harsh daylight, use an ND filter to bring exposure down.
6. Neutral Density (ND) Filter
When bright light sends zebras into clipping, an ND filter is the fastest fix. It cuts light before it reaches the lens, which lets you bring exposure back under control without throwing off color. In plain English: it’s glass or resin that darkens the scene evenly, not a trick that shifts the look.
Why does that matter? Because ND lets you control exposure without changing motion. You can keep a natural shutter speed and a wide aperture in bright conditions without blowing out the image. That makes ND the go-to tool for outdoor teleprompter shots, where you need motion to look steady and exposure to stay in check at the same time.
A simple rule of thumb:
- Use lighter ND in shade
- Use stronger ND in direct sun
- For window-lit indoor setups, ND can help keep detail outside the window while still exposing the subject the right way
That last point comes up a lot in talking-head videos. If your subject is sitting next to a big, bright window, the outside can turn into a white mess fast. ND gives you more room to hold that exterior detail without sacrificing the face.
If image quality is the top goal, use fixed ND. If the light is changing fast, variable ND is more convenient. Just don’t push a variable ND to its maximum range. That’s usually where problems start: color casts, uneven darkening, and the dreaded X-patterning.
After you add ND, check your histogram or waveform again. Then confirm face exposure with zebras.
7. Handheld Light Meter
A handheld light meter gives you a repeatable baseline for teleprompter shoots, interviews, and studio videos. It measures the light falling on your subject before it reaches the camera. That’s called incident metering. Because of that, it doesn’t get fooled by dark clothing, bright shirts, or a high-contrast background. That’s a big deal for teleprompter work and interview setups you need to repeat.
Here’s the basic flow:
- Place the meter at face level
- Point the white dome (lumisphere) at the camera for a general reading
- Point it at the light when you want to check ratios
- Set your aperture to the reading the meter gives you
The main win here is repeatability. Say you log a setup at ISO 800, 1/50 sec, and f/4. Later, you can rebuild that same setup by adjusting your lights until the meter hits that same reading again. If you shoot the same scene across more than one session, that kind of consistency matters. You don’t want one interview day to look slightly brighter or flatter than the next.
Entry-level meters like the Sekonic L-308X-U are a common starting point for this kind of work.
Use the meter to dial in your base exposure first. Then check highlights and skin tones with a histogram or false color. Think of the meter as your starting point, then pair it with visual checks in the comparison table.
Comparison Table: Which Exposure Tool Solves Which Problem?
After the tool-by-tool breakdown above, this table helps you choose the right one fast.
Each tool lines up with the exposure issue it solves most directly.
| Tool | Strongest Use Case | Problem It Prevents | Best Setup |
|---|---|---|---|
| Evelize | Scripted talking-head videos (YouTube, online courses, Reels) | Inconsistent exposure and framing across takes or episodes | Solo teleprompter shoots |
| Histogram | Quick brightness check during run-and-gun or outdoor shooting | Overall overexposure or underexposure; clipped shadows or highlights | Run-and-gun outdoor shoots |
| Waveform Monitor | Multi-camera interviews, studio product shoots, complex lighting | Uneven brightness across the frame; bright backgrounds overpowering subjects | Controlled studio setups |
| False Color | Cinematic and HDR-focused work; skin-tone accuracy | Incorrect skin-tone exposure; blown-out skies or backgrounds | High-contrast or window-lit scenes |
| Zebra Patterns | Run-and-gun shoots, wedding videography, beauty tutorials | Clipped highlights on faces, white clothing, or reflective surfaces | Mixed controlled and uncontrolled lighting |
| ND Filter | Outdoor daylight shoots - street interviews, travel, fitness content | Forced overexposure and unnatural shutter speeds | Daylight exteriors |
| Handheld Light Meter | Studio interviews, commercial work, multi-camera podcast setups | Guesswork-based exposure; inconsistent brightness across cameras or shoot days | Repeatable studio or on-location setups |
Here’s the short version: histogram gives you the fastest overall read, waveform shows where brightness shifts across the frame, false color helps dial in skin tone, and zebras warn you when parts of the image hit a set limit.
A simple way to work: use histogram or zebras for a fast check, then move to waveform or false color when you need tighter control. Add an ND filter in harsh daylight, and bring in a light meter when matching shots across cameras or shoot days matters.
How to Use These Tools Together in a Real Shoot
Video Exposure Workflow: 5 Steps to Perfect Exposure Every Shoot
Once you know what each tool does, there’s a simple way to use them on set. The order matters: lock motion, control light, then check skin.
Set Frame Rate and Shutter Speed First
Start by locking your motion settings before you touch anything else. Frame rate and shutter speed shape how movement looks. They’re not your main brightness controls.
If you change them later just to fix exposure, your footage can end up looking jittery or smeared. That’s the kind of thing people notice right away, even if they can’t explain why. Once those settings are locked, use aperture, ISO, and ND filters to handle brightness from that point on.
When motion is set, move on to exposure.
Use an ND Filter When Daylight Is Too Strong
Set your ISO to its base value. Then choose your aperture based on the depth of field you want.
If the image is still too bright after your shutter, aperture, and base ISO are set, add ND until the exposure falls into range. Simple as that.
Then check the result with a histogram or waveform.
Check Overall Brightness with a Histogram or Waveform Monitor
Use the histogram for a quick glance. Then use the waveform to place parts of the frame more precisely.
For example, a window-lit talking head might show the background spiking near 100 IRE while the subject’s face sits around 50–60 IRE. That’s usually fine, as long as the face itself isn’t drifting up toward the top line.
Once the full frame looks right, check the face.
Confirm Face Exposure with Zebra Patterns or False Color
Use zebras for a fast face check. If zebras cover the entire face, pull the exposure down a bit. If they vanish completely, the face may be too dark.
False color helps even more when you’re shooting log or HDR. In those modes, the preview can look washed out, which makes it harder to judge by eye.
After that, you’re ready to roll.
Record Scripted Takes with a Teleprompter Workflow
Once exposure is locked, open Evelize, load the script, and keep your framing and eyeline steady across takes.
Conclusion
Good video exposure doesn’t come from chasing one perfect tool. It comes from building a small toolkit you can count on for the way you shoot.
For scripted shoots, that usually starts with the right teleprompter workflow. It helps to think in three layers: scripting, monitoring, and light control. A teleprompter workflow like Evelize can keep takes steady and cut down on retakes. For monitoring, use a histogram or waveform to check overall brightness. Use zebras or false color to watch faces and highlights. When the light is too strong, bring in ND filters or a light meter.
After that, match your tools to your shooting style. If you film outdoors a lot, start with an ND filter and zebras. If you film indoors more often, begin with a waveform monitor and false color. Then build from there as your needs change.
Viewers tend to notice uneven brightness, clipped highlights, and muddy skin tones long before they notice one perfect frame. That’s why stable exposure across an entire shoot usually feels more polished than a single great shot mixed in with uneven ones.
Start simple: one app, one monitoring tool, and one light-control accessory. Add more only when you have a clear reason to.
FAQs
Which exposure tool should I start with?
Start with Evelize’s recording settings, especially 4K and HDR, to get bright, balanced footage.
You can also tweak the teleprompter background color to cut glare and control light output. For the best results, use these features alongside a solid lighting setup, like LED panels or softboxes, before you hit record.
How do I expose skin tones correctly?
Set white balance with a neutral white or gray card under your main light. That simple step helps you avoid odd orange, blue, or green casts that can make footage look off right away.
A three-point lighting setup also goes a long way. Use a key light, fill light, and backlight to shape the subject and keep the scene evenly lit without making it look flat.
In post, check exposure and color with waveform monitors and vectorscopes. Then use secondary grading to fine-tune skin tones so they look natural and consistent.
When should I use an ND filter?
The provided information doesn’t explain when to use ND filters.
For proper exposure, focus on controlling your lighting setup instead. A three-point lighting setup, adjustable LED panels, and diffusion can help soften harsh light and give you more control over how your shot looks.
You can also record in 4K HDR at 60 FPS with Evelize to help maintain a polished, consistent video workflow.
Related Posts
Ready to Elevate Your Content?
Try Evelize for free and experience the easiest way to create, edit, and share professional videos. Script writing, teleprompter, and powerful video tools - all in one app!


