
How to Use 3-Point Lighting for Videos
How to Use 3-Point Lighting for Videos
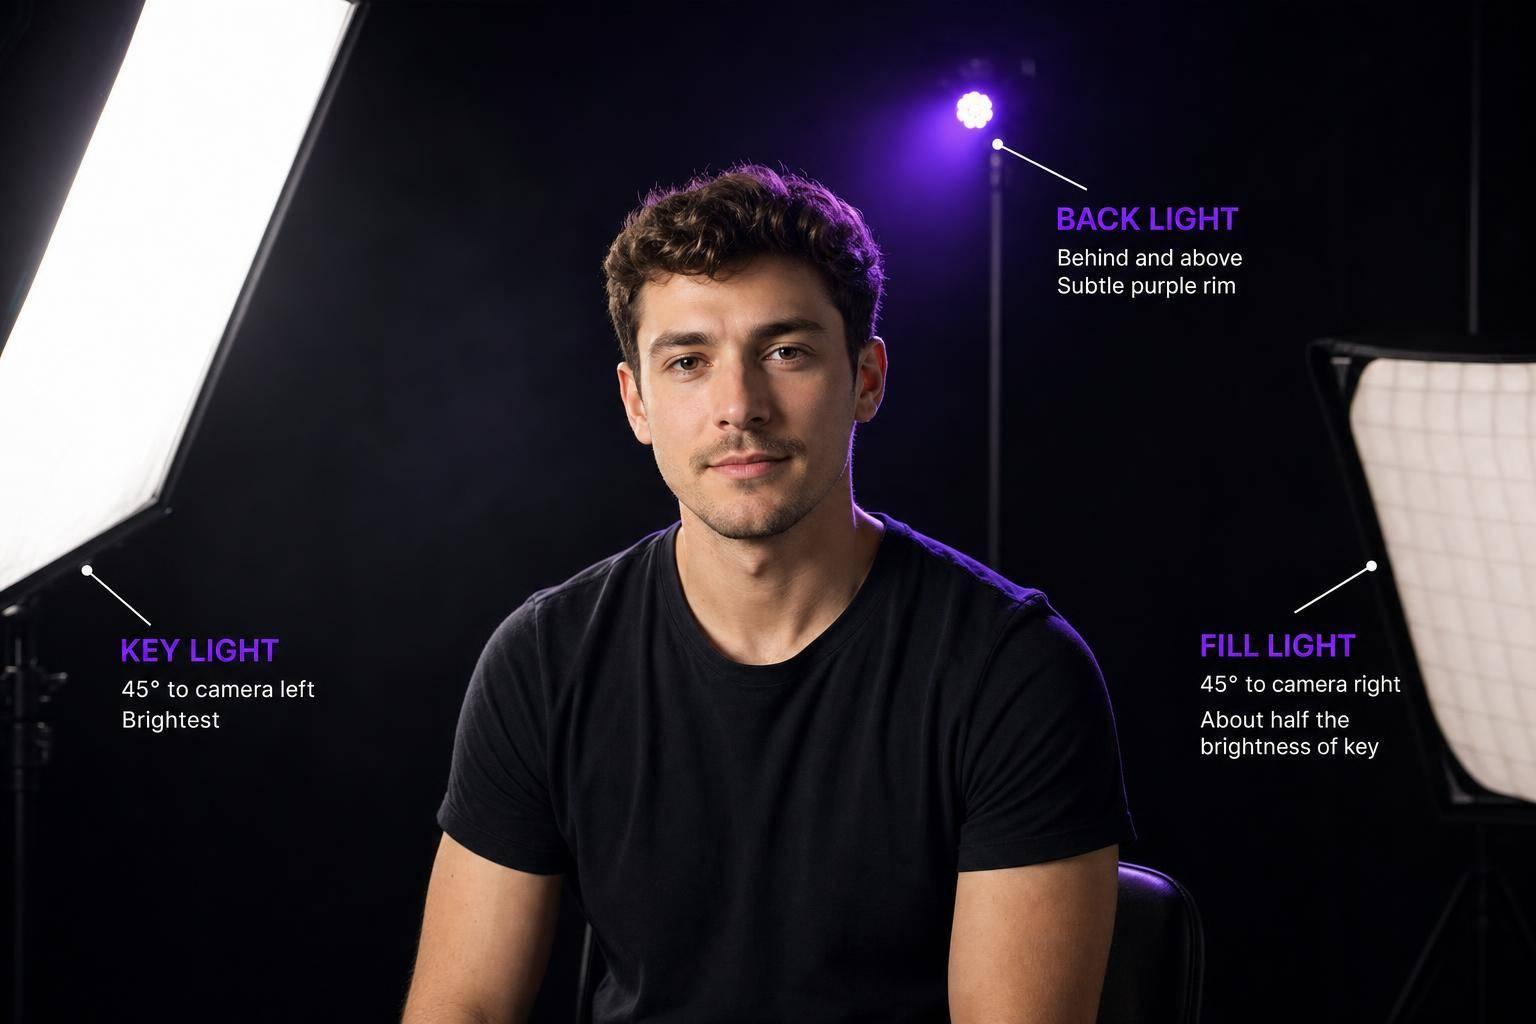
Bad lighting can make a solid video look weak in seconds. I fix that with a simple 3-point setup: one key light to shape the face, one fill light to soften shadows, and one backlight to separate the subject from the background.
If I want a clean talking-head shot, this is the setup I start with. I place the key light about 30–45° off-camera and slightly above eye level, keep the fill at about 25%–50% of the key, and put the backlight behind and above the subject to add a light edge on the hair and shoulders. Then I test a 20–30 second clip, check skin tones, shadows, and background brightness, and mark every stand with tape so I can set it up the same way next time.
Here’s the whole process in plain English:
- Key light: Main light. Put it 30–45° to one side and a little above eye level.
- Fill light: Put it on the other side, closer to camera, and keep it dimmer than the key.
- Backlight: Put it behind and above the subject so they don’t blend into the background.
- Soften harsh light: Use a softbox, umbrella, white wall, or even a white shower curtain.
- Match color temperature: Use one light type and set white balance by hand, like 5600K or 3200K.
- Test and lock it in: Record a short clip, make small changes, and tape your stand positions.
What I like about this setup is that it solves the three big video lighting problems fast: flat faces, dark shadows, and dull backgrounds. Set the main light first, keep the fill lower, and use the backlight with care. That’s the core idea.
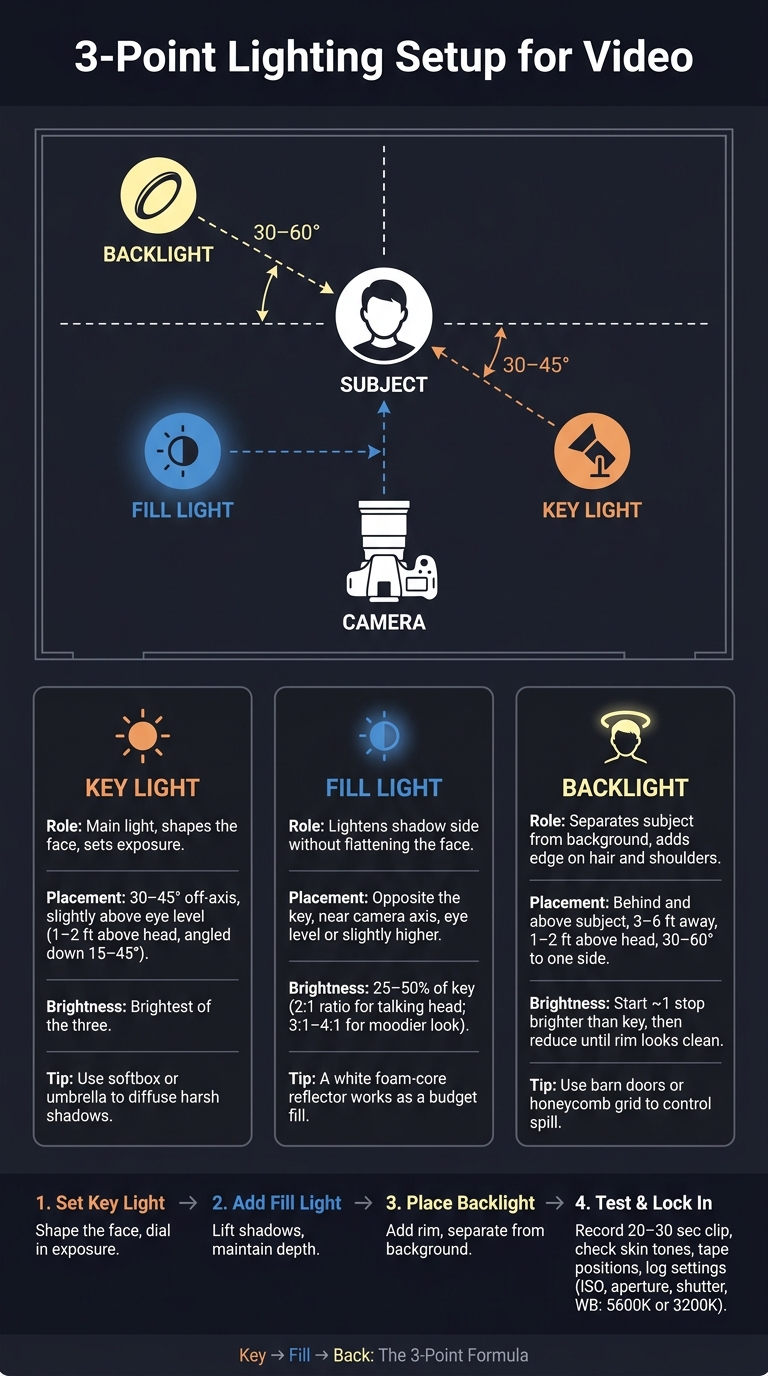
3-Point Lighting Setup for Video: Step-by-Step Visual Guide
Three Point Lighting Setup (Best Lighting for YouTube Videos Tutorial)
sbb-itb-4a26d6a
Step 1: Set the Key Light
Start with the key light. It does the heavy lifting, because it shapes your face and sets the contrast the fill and backlight will support. If you get this part right first, the rest of the setup is much easier to dial in.
Place the Key Light at the Right Angle and Height
Place the key light about 30–45° off the camera-to-subject line and slightly above eye level, angled down toward your face. A good starting point is around 1–2 feet above the top of your head, tilted down roughly 15–45°.
You’ll know it’s close when you see a small nose shadow and a light shadow on the far cheek. That’s usually the sweet spot: not flat, not too dramatic.
Common fixes:
- Flat lighting: Move the key farther to the side and raise it a bit.
- Heavy one-sided shadow: Bring the light back closer to 30° and add a reflector on the shadow side.
- Forehead glare: Soften the light or move it farther away if it’s aimed too far downward.
- Glasses: Move the key light farther to the side so reflections slide off the center of the lenses.
Set Brightness and Softness for Your Shot
Set exposure so skin looks bright but natural, with no clipped highlights. For softness, start by placing the key light 2–4 feet from your face.
If the shadows still look harsh, add diffusion with a softbox, shoot-through umbrella, or even a white shower curtain. In a small room, you can also bounce the key off a white wall. That gives you a larger, softer source without adding more gear.
Once the key is in place, you can bring in the fill light to control the shadows.
Key Light vs. Fill Light vs. Backlight: Quick Comparison
- Key light: The brightest source. It sets exposure and defines face shape. Place it 30–45° off-axis, slightly above eye level.
- Fill light: Softer, usually around 25–50% of the key’s brightness. Place it opposite the key to reduce shadow contrast.
- Backlight: Dimmer than the key. Place it behind and above the subject to add edge light and help them stand out from the background.
Step 2: Add the Fill Light to Control Shadows
Now that the key light is doing the main shaping, the fill light has a simpler job: lighten the shadow side without flattening the face. You want the darker side to stay visible, but you don't want to wipe out all the shape. Set the fill on the shadow side, close to the camera axis, and point it toward the darker cheek and eye.
Place the Fill Light on the Shadow Side
Place the fill light on the opposite side of the camera from the key, close to the camera axis, and aim it at the darker cheek and eye. A good starting point is eye level or just a bit higher.
Working on a tight budget? A white foam-core board or reflector on the shadow side can bounce the key light back onto the face. That gives you a soft, natural-looking fill without adding another fixture.
Keep the Fill Light Weaker Than the Key
The fill should stay clearly dimmer than the key so the face keeps its shape and depth. A 2:1 ratio is a strong starting point for clean talking-head videos. It keeps the shadows visible without making them distracting.
If you want a moodier look, lower the fill to about 25% to 45% of the key's brightness. That puts you closer to a 3:1 or 4:1 ratio, which leaves more shadow on the darker side of the face.
You can reduce the fill in a few simple ways:
- Use a dimmer
- Move the light farther back
- Add diffusion
Diffusion makes the fill softer, which helps a lot in close-up shots.
Step 3: Add the Backlight for Subject Separation
Now that the key and fill are balanced, add the backlight to pull the subject away from the background. This light puts a soft rim on the hair and shoulders, which gives the shot more depth and shape. Without it, the image can still look a little flat.
Position the Backlight Behind and Above the Subject
Set the backlight behind the subject and a bit above head level, then angle it down so it brushes across the hair and shoulders. A good starting point is 3–6 feet away, 1–2 feet above the head, and 30–60° off to one side - usually the side opposite the key.
If you're working in a small room, a boom arm or tall C-stand helps a lot. It lets you place the light behind the subject without the stand sneaking into the frame. If a straight-behind position isn't possible, move the light to a back corner and aim it diagonally across the shoulders. The goal is simple: skim the edges, not the full background.
Once the light is roughly in place, adjust the angle and control spill.
Avoid Lens Flare and Keep the Edge Light Subtle
Keep the backlight out of the camera's direct line of sight so you don't get lens flare. If the fixture shows up in the shot, raise it, move it farther off to the side, or hide it with a flag.
For brightness, start at about 1 stop brighter than the key, then lower it until the rim looks clean instead of flashy. You want the edge light to define the subject, not steal attention from the face. If the outline starts looking like a bright halo, you've gone too far.
A few simple tools can help keep the beam under control:
- Barn doors
- A honeycomb grid
- Black foam board
Use them to tighten the spread and keep spill off the background. If the light creates harsh hot spots on hair or clothing, add diffusion to soften it.
Balance, Test, and Lock In Your Setup
Once your three lights are in place, clean up the room before you test anything. Turn off overhead lights, table lamps, and any other room lights that aren't part of the setup. Cover windows with blackout curtains or thick shades. Stick with one color source across the whole scene: either daylight-balanced LEDs or tungsten-balanced lights. Mixing them is asking for weird color shifts. Set your camera’s white balance by hand - 5600K for daylight LEDs or 3200K for tungsten - so it stays steady from one take to the next.
Check Exposure, Skin Tones, and Background Brightness
Now test the full setup on camera. Record a 20–30 second clip of yourself talking. Then play it back and look at three areas: your face, the shadows, and the background.
On your face, watch for forehead shine, under-eye shadows, and any odd color tint. In the shadows, you want detail to stay visible, but you don’t want the image to look washed out. For the background, the goal is simple: it shouldn’t be brighter than your face or pull attention away from you.
Don’t judge exposure from the camera screen alone. Use your histogram or waveform instead. Midtones should land around middle gray, while highlights stay clear of clipping and shadows avoid getting crushed.
If something looks off, make small changes. Move a light 2–3 inches closer or farther away, tweak the angle a little, or lower the key before you add more fill. Small moves can change a lot on camera. For darker skin tones, a slight bump in key light output or softer diffusion can help avoid underexposure.
Mark Stand Positions for Faster Future Shoots
When the test looks right, lock the setup down. Put gaffer tape on the floor at the feet of each light stand and your camera tripod. Label each mark clearly: Key, Fill, Back, and Cam. Then write down each light’s distance, height, angle, power, color temperature, and modifier, along with your camera settings: ISO, aperture, shutter speed, and white balance.
Save this as a lighting log for repeat shoots. For example, keep one setup log for tutorials and another for interviews. That way, you’re not rebuilding the whole thing every time.
Conclusion: 3 Steps to Professional Video Lighting
The setup boils down to three moves: start with the key light to shape the face and set exposure, add a weaker fill light about 1–2 stops under the key to lift shadows without flattening the image, and place a controlled backlight behind and above the subject to separate them from the background.
Short test clips and a written record of your settings are what make the setup repeatable, shoot after shoot.
FAQs
What if I only have one light?
You can still get a professional look with just one light. Set it about 45 degrees to your face and a little above eye level.
If the shadows feel too harsh, soften the light with a diffuser or softbox. You can also bounce light back with a white poster board or even a bedsheet. That helps even out your face and keeps your video in Evelize clean and sharp.
How far should the subject be from the background?
For a more polished look, place the subject 3 to 6 feet from the background. That gap helps blur the background a bit and keeps the light from making the whole scene look flat.
It also gives the rim light - also called backlight - more room to show up around the head and shoulders.
What’s the best 3-point setup for glasses?
The main goal is simple: keep light from bouncing straight off your lenses.
A small change in angle can make a big difference. Try tilting your glasses slightly downward or placing your lights higher so the reflection misses the camera. It also helps to avoid pointing lights straight at your lenses.
If you’re using a teleprompter, keep the key light off the camera axis and aim it at your face, not the glass. In most cases, minor tweaks do the job:
- Raise the light a few inches
- Move it a bit farther to the side
That’s often all it takes to cut glare without changing your whole setup.
Related Posts
Ready to Elevate Your Content?
Try Evelize for free and experience the easiest way to create, edit, and share professional videos. Script writing, teleprompter, and powerful video tools - all in one app!


