How To Add Visual Cues to Teleprompter Scripts
How To Add Visual Cues to Teleprompter Scripts
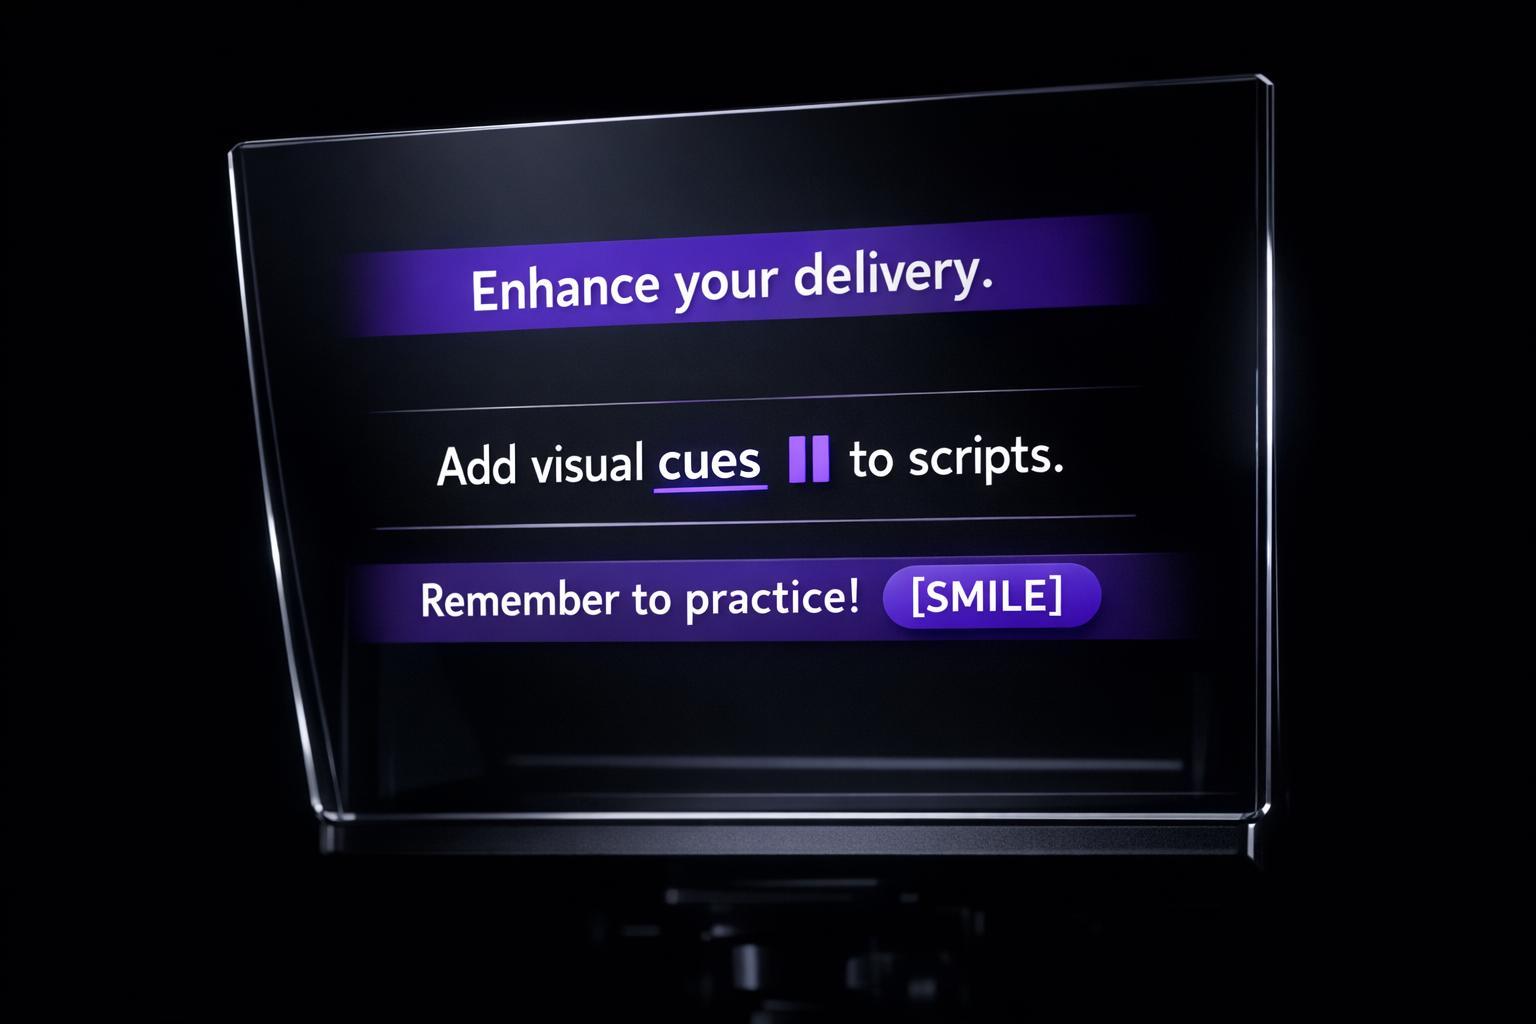
Want to improve your on-camera delivery? Visual cues can help. They guide your performance, making your speech smoother, pacing natural, and delivery engaging. By embedding prompts like [PAUSE], [SMILE], or bold text for emphasis, you can stay on track and connect better with your audience. Here's how:
- Highlight Key Points: Use bold text or ALL CAPS to emphasize important words.
- Manage Timing: Add [PAUSE] or line breaks to control pacing and avoid rushing.
- Enhance Expressions: Include cues like [SMILE] or [GESTURE] to match your tone.
- Coordinate Production: Use notes like [Cut to close-up] for seamless edits.
Tools like Evelize make adding and managing these cues simple. Customize scrolling speed, adjust formatting, and rehearse for a polished performance. Visual cues not only improve your delivery but also reduce retakes and make your videos more impactful.
Script Formatting Tips for Using a Teleprompter
sbb-itb-4a26d6a
Types of Visual Cues and How to Use Them
Visual cues can be grouped into three main categories, each designed to improve how you deliver content on camera. Below is a breakdown of these categories, along with tips for using them effectively to create engaging and natural video performances.
Emphasis Markers
Markers like bold text, ALL CAPS, and underlines help highlight words or phrases that require extra emphasis. These tools guide you to deliver key points with the right tone and energy. For example, in the sentence "This feature saves you hours every week", the emphasis on "hours" ensures it stands out. Additionally, phonetic spellings (like "uh-BILL-ih-tee" for "ability") can help you pronounce tricky words with confidence.
Pause and Timing Indicators
Cues such as [PAUSE], [BEAT], or slashes (/, //) are essential for managing the pacing of your delivery. For instance, [BEAT] signals a brief pause, while [PAUSE] suggests a longer break to let an important idea sink in. Breaking your script into smaller chunks or short paragraphs also helps you avoid rushing through dense sections, making your delivery smoother and more engaging.
Performance and Action Cues
These cues ensure your body language and production elements align with your message. Prompts like [SMILE], [GESTURE], or [LEAN IN] remind you to use appropriate expressions and movements. Meanwhile, production notes such as [ROLL VIDEO] or [Cut to product close-up] help coordinate actions with your editor. Always place these cues in brackets to distinguish them from the script and avoid accidentally reading them aloud.
Now that you understand these cue types, the next step is learning how to incorporate them effectively using Evelize for a polished teleprompter performance.
Step-by-Step Guide: Adding Visual Cues Using Evelize
Opening and Preparing Your Script
Evelize, a teleprompter app, simplifies script creation and cue management. To get started, tap "Create" and draft your script directly within the app. This keeps everything organized and eliminates the need for juggling external notes. If you're managing multiple projects, the app’s search tool lets you quickly find specific scripts with keywords or phrases.
Before adding visual cues, tweak the settings for better readability. Adjust the font size, change the background color for high contrast (especially helpful in bright environments), and switch to landscape mode. These adjustments ensure your script stays clear and your cues are easy to follow.
Inserting and Formatting Cues
Visual cues can be added manually while drafting your script. Use bold text or ALL CAPS to highlight key points. For timing, include bracketed cues like [PAUSE] or [BEAT] exactly where they’re needed. To indicate natural pauses without overloading your script, rely on spacing or line breaks.
Incorporating these cues and even phonetics at this stage can save time during post-recording edits, making the process smoother and more efficient.
Customizing Teleprompter Settings
Once your cues are in place, fine-tune the scrolling speed to align with your natural speaking rhythm. This helps avoid awkward pacing. Content creator Selavant shares, "The ability to customize the text scrolling speed allows me to maintain a natural and steady pace, without any awkward pauses or rushed moments."
Before recording, run a quick test to ensure that your visual cues are timed correctly and remain distinct from the main text. These adjustments will help you deliver your script smoothly and confidently.
Best Practices for Using Visual Cues
After adding cues in Evelize, fine-tune your script using these tips to ensure a smoother and more polished delivery.
Keep It Simple
Stick to clean, uncluttered visuals. Too many styles or formatting choices can overwhelm the screen and distract from your delivery. Opt for modern sans-serif fonts like Arial or Calibri in sizes between 24–36 points for easy readability. Keep each line concise - around 15 to 20 words - to minimize scrolling and maintain a consistent flow.
Use Blank Space for Pauses
Strategically placed blank lines can signal natural pauses while giving you room to breathe and your audience time to process your points. Avoid dense paragraphs by breaking long sentences into smaller chunks, ensuring each new idea starts on a fresh line. This approach prevents rushed delivery. Use 1.5 or double line spacing to make the text easier to follow and reduce eye strain when moving between lines. Pair blank space with bracketed cues like [PAUSE] for clear guidance on when to pause naturally. Once these cues are in place, test them to confirm they feel intuitive during delivery.
Test and Adjust for Clarity
After your initial edits, practice reading the script with cues in Evelize. This step helps identify sections where pacing feels unnatural or cues don’t align with your speaking rhythm. A script might look great in writing but feel awkward when spoken aloud. Testing allows you to catch and fix these issues. Use a stopwatch to time your delivery - remember, a one-minute video typically equals about 125 to 150 words. If you find yourself stumbling or losing your place, consider increasing the font size or line spacing for better readability.
"Familiarizing yourself with a text reduces the mental load required to perform a task, freeing up your cognitive resources to focus on delivery and emotion." - Even Realities
Refine any lines that sound robotic or forced. These adjustments are key to achieving a confident, smooth performance on camera, keeping your audience engaged from start to finish.
Common Mistakes and How to Fix Them
Common Teleprompter Script Mistakes and Solutions Guide
Even seasoned users can face challenges when incorporating visual cues into their scripts. Catching these issues early can save you from headaches during recording. The most noticeable problems often include visible eye movements from losing focus, a disrupted rhythm, or a mismatch between your narration and on-screen visuals.
One of the biggest culprits is missing pacing cues. Without clear timing markers, you may trip over your words, lose track of your place, or struggle to maintain a smooth flow. Another common issue is leaving out visual cues during the writing process. If you focus only on the narration and neglect planning for elements like cutaways, graphics, or B-roll, your final video may feel chaotic, with your speech poorly synced to the visuals.
Using overly formal or complex language can also hurt your delivery. A stiff tone can make you sound robotic and fail to engage your audience. On top of that, long paragraphs can lead to excessive eye movement, making it easy to lose your spot on the teleprompter.
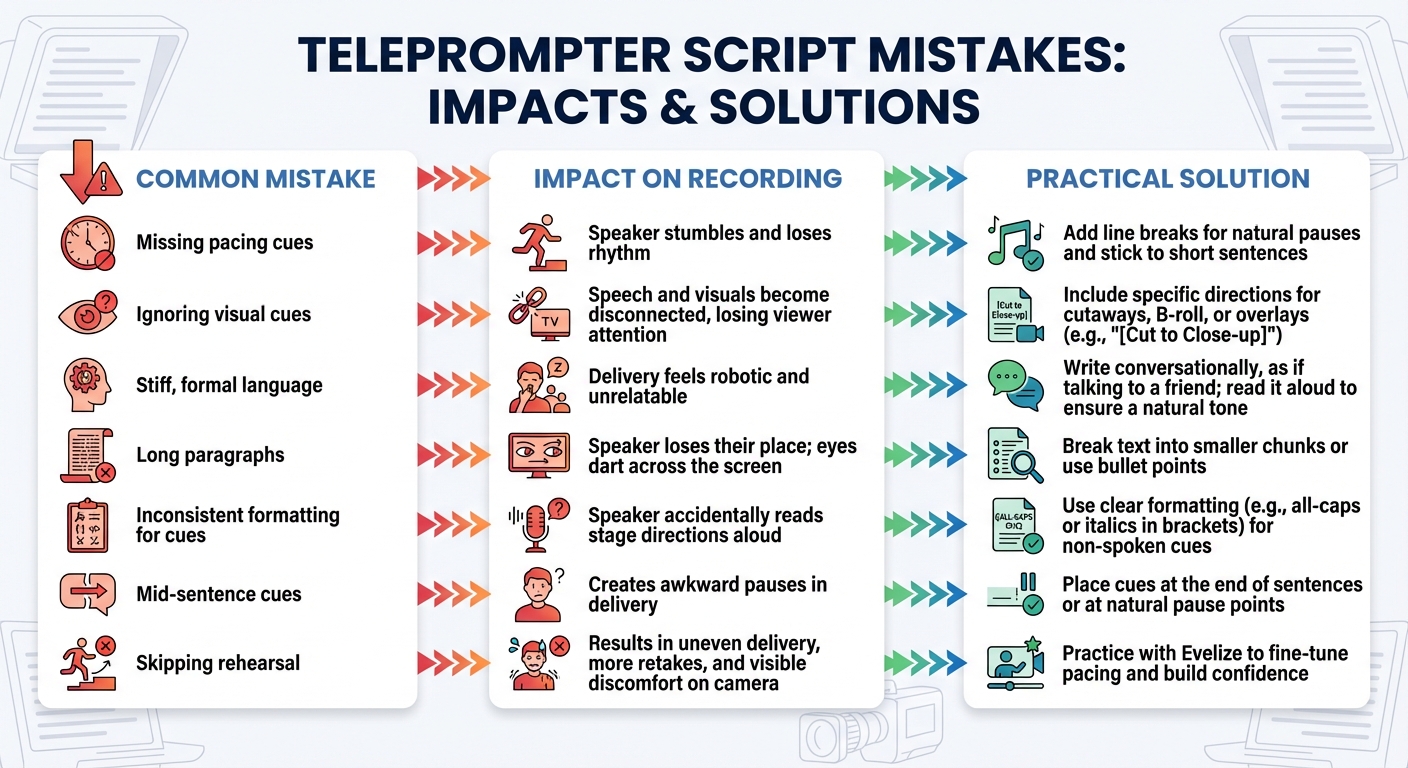
The table below outlines these common mistakes, their effects, and actionable solutions to help you create a polished and engaging script.
Mistakes, Impacts, and Solutions Table
| Common Mistake | Impact on Recording | Practical Solution |
|---|---|---|
| Missing pacing cues | Speaker stumbles and loses rhythm. | Add line breaks for natural pauses and stick to short sentences. |
| Ignoring visual cues | Speech and visuals become disconnected, losing viewer attention. | Include specific directions for cutaways, B-roll, or overlays (e.g., "[Cut to Close-up]"). |
| Stiff, formal language | Delivery feels robotic and unrelatable. | Write conversationally, as if talking to a friend; read it aloud to ensure a natural tone. |
| Long paragraphs | Speaker loses their place; eyes dart across the screen. | Break text into smaller chunks or use bullet points. |
| Inconsistent formatting for cues | Speaker accidentally reads stage directions aloud. | Use clear formatting (e.g., all-caps or italics in brackets) for non-spoken cues. |
| Mid-sentence cues | Creates awkward pauses in delivery. | Place cues at the end of sentences or at natural pause points. |
| Skipping rehearsal | Results in uneven delivery, more retakes, and visible discomfort on camera. | Practice with Evelize to fine-tune pacing and build confidence. |
Practicing Scripts with Visual Cues in Evelize
Once your script is formatted, the next step is perfecting your delivery. The goal? To make those visual cues second nature. When pauses and emphasis markers become automatic, you can focus on engaging with your audience instead of just reading words off a screen.
Start by setting the scrolling speed to match your natural speaking rhythm. Choose a pace that feels like a real conversation. Begin practicing at a slower speed to get comfortable with the cues, then gradually pick up the pace as your confidence grows. This method helps you avoid awkward stops or rushed moments that can make a video feel less polished. As you practice, Evelize's playback features allow you to spot areas for immediate improvement.
Evelize’s 4K resolution and 60 FPS playback provide crystal-clear feedback during rehearsals. The smooth scrolling motion makes it easier to follow your cues without distractions. Use the 4K preview to ensure your emphasis markers and timing indicators stand out against your chosen background.
"Rehearsal is where anxiety drops." - MeyerPro
Review your practice sessions at 60 FPS to check for smooth transitions in eye contact, gestures, and action cues. If you stumble on a cue, Evelize’s editing tools let you fine-tune it right away. This seamless adjustment process ensures your delivery keeps improving with every take.
Conclusion
Visual cues can transform your on-camera delivery. They help minimize retakes, streamline post-production, and maintain natural eye contact with your audience. Instead of sounding robotic or overly rehearsed, your delivery becomes more conversational and confident - qualities viewers expect from polished, professional content. These advantages align perfectly with the tools offered by Evelize.
Evelize simplifies the process of adding visual cues. The in-app script editor allows you to include emphasis markers, timing notes, and action cues directly into your script. Plus, its customizable settings ensure your cues remain clear and effective in any environment. With 4K resolution and 60 FPS playback, you can review your performance in detail and make precise adjustments on the spot.
The platform’s centralized script creation and search features save you time, so you can focus on producing engaging videos. Since its launch in 2018, over 1,000,000 creators have used Evelize to record millions of videos. By incorporating visual cues, you can enhance your delivery, and Evelize provides the tools to make it happen. Features like adjustable scrolling speed and blank spaces for natural pauses help reduce speaker anxiety and promote a more confident performance.
Start small with basic markers, test your approach, and fine-tune for a seamless result. With visual cues and Evelize's advanced features working together, you can create videos that look and sound exactly as you imagined. Use these strategies to take your scripts - and your content - to the next level.
FAQs
Which visual cues should I use most often?
Cue indicators are among the most popular visual aids for staying in sync with your script and delivering a seamless performance. You can tailor these indicators to match your needs by tweaking settings such as style, height, width, transparency, position, line thickness, and color. They act as a reliable guide, helping you stay focused and deliver a more natural on-camera presence.
How do I keep cues from being read out loud?
When recording, make use of visual markers that are solely for your eyes and won't be read aloud. Adjust the cue indicators in your teleprompter app to help you silently follow along. Also, structure your script with noticeable visual cues that are easy to identify but kept apart from the spoken text. This approach helps maintain a seamless delivery without mistakenly saying the cues out loud.
What scrolling speed should I set in Evelize?
Adjust the scrolling speed in Evelize to align with your natural speaking pace for a smooth delivery. Simply slide the speed bar to the right for a quicker pace or to the left for a slower one. The best part? You can tweak the speed even while recording, as the control stays visible for easy access.
Related Posts
Ready to Elevate Your Content?
Try Evelize for free and experience the easiest way to create, edit, and share professional videos. Script writing, teleprompter, and powerful video tools - all in one app!
